The PlayStation 5 might be here, but the PlayStation 4 still overshadows it with the quantity and quality of its video game library. Unfortunately, the DualShock 4 controller’s sealed, non-replaceable battery is the weakest link in the aging console.
Most PS4 owners discard their controllers once the battery refuses to hold a charge. Although Sony expects you to fork out cash for a new one, it’s cheaper to replace the battery for a fraction of the cost.
Here’s how you can do just that.
Making Sure It’s a Battery Issue
Testing for known DualShock 4 controller issues beforehand will save you the trouble and expense of replacing a perfectly fine battery. Resetting the controller to the factory defaults is a good start.
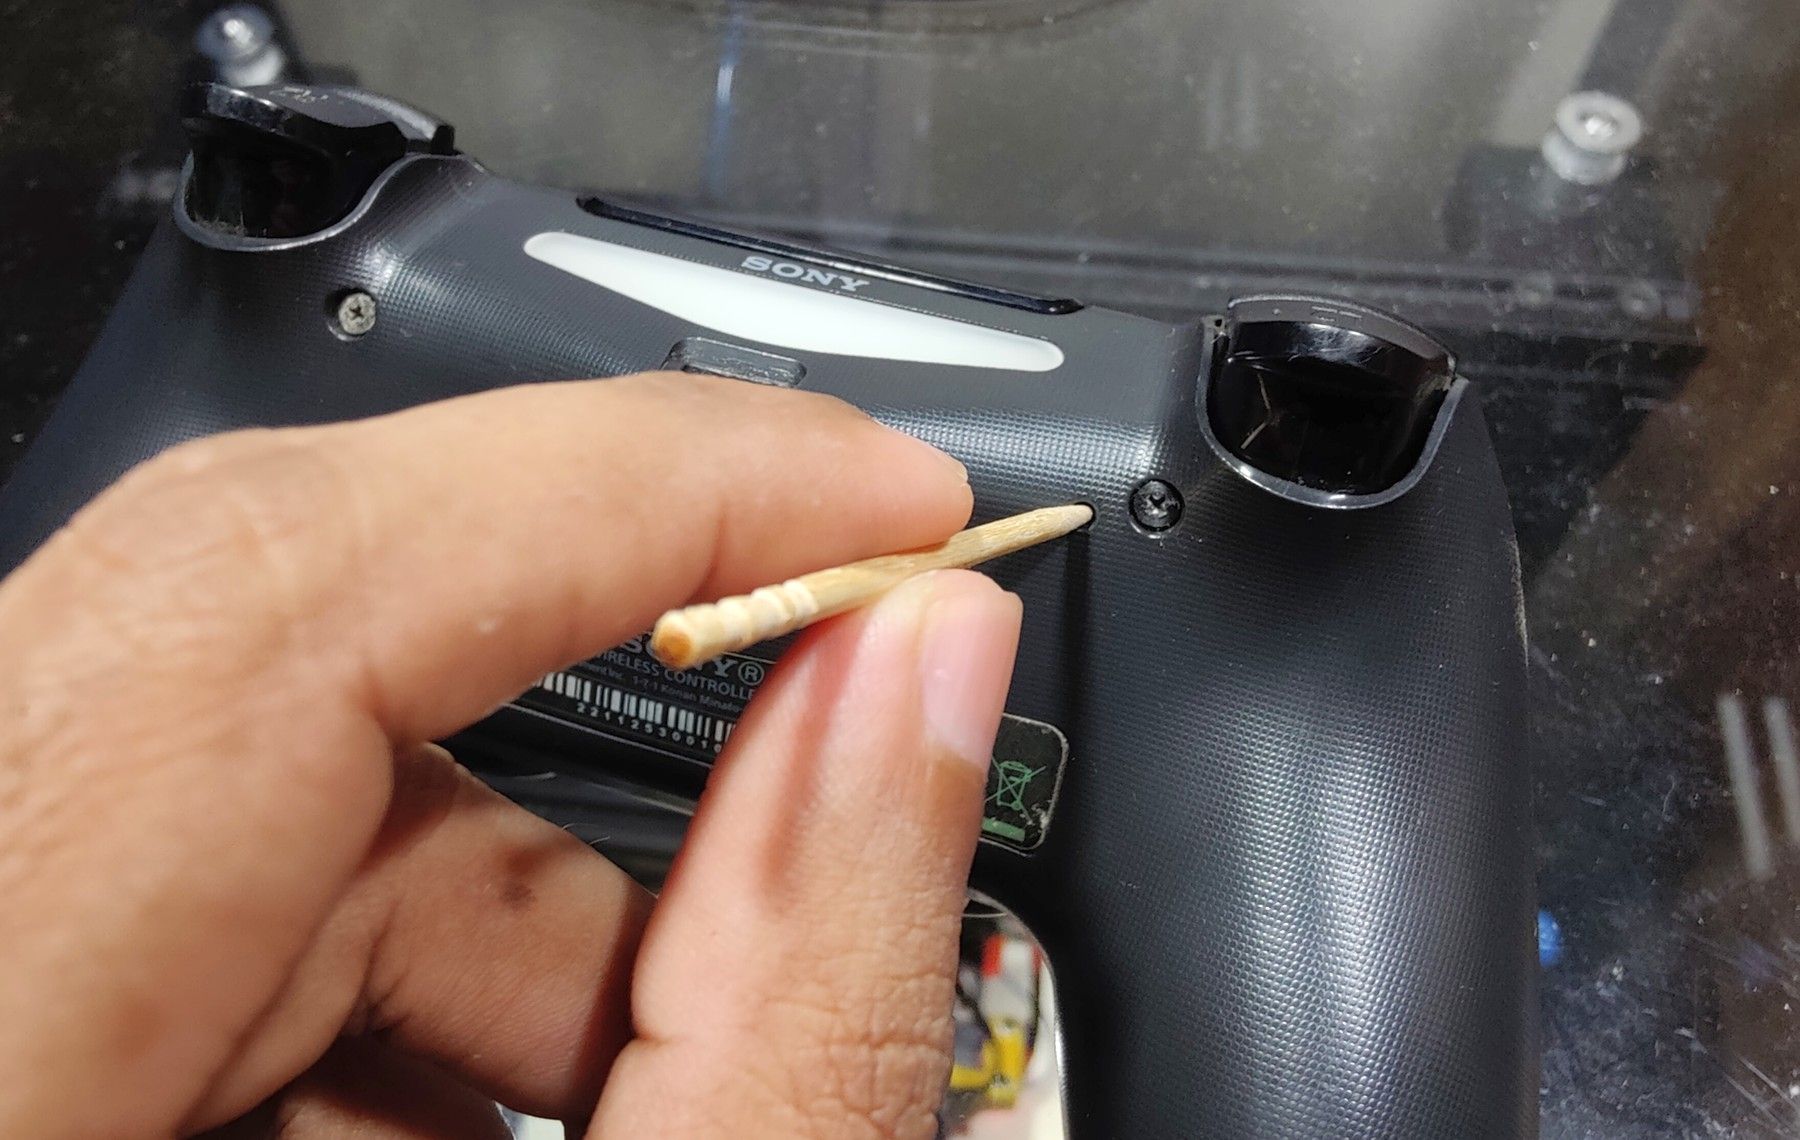
That involves pressing the reset button hidden alongside the screw located next to the L2 analog trigger. The button can be accessed by poking a toothpick through the tiny hole. Depress and hold the tactile switch for ten seconds before releasing it again.
This should reset your controller. Thereafter, hook it up to the console using a USB cable and initiate the pairing process by holding down the PS button between the analog sticks for three seconds.
If the controller still doesn’t respond, try another USB cable and/or port to be sure.
Purchasing a Replacement DualShock 4 Battery
The stock PS4 controller is equipped with a 3.7 V lithium polymer (LiPo) battery rated for a capacity of 1000 mAh. Replacement batteries are generally available in capacities ranging from 1200 mAh to 2500 mAh. Avoid anything lower than the stock capacity.
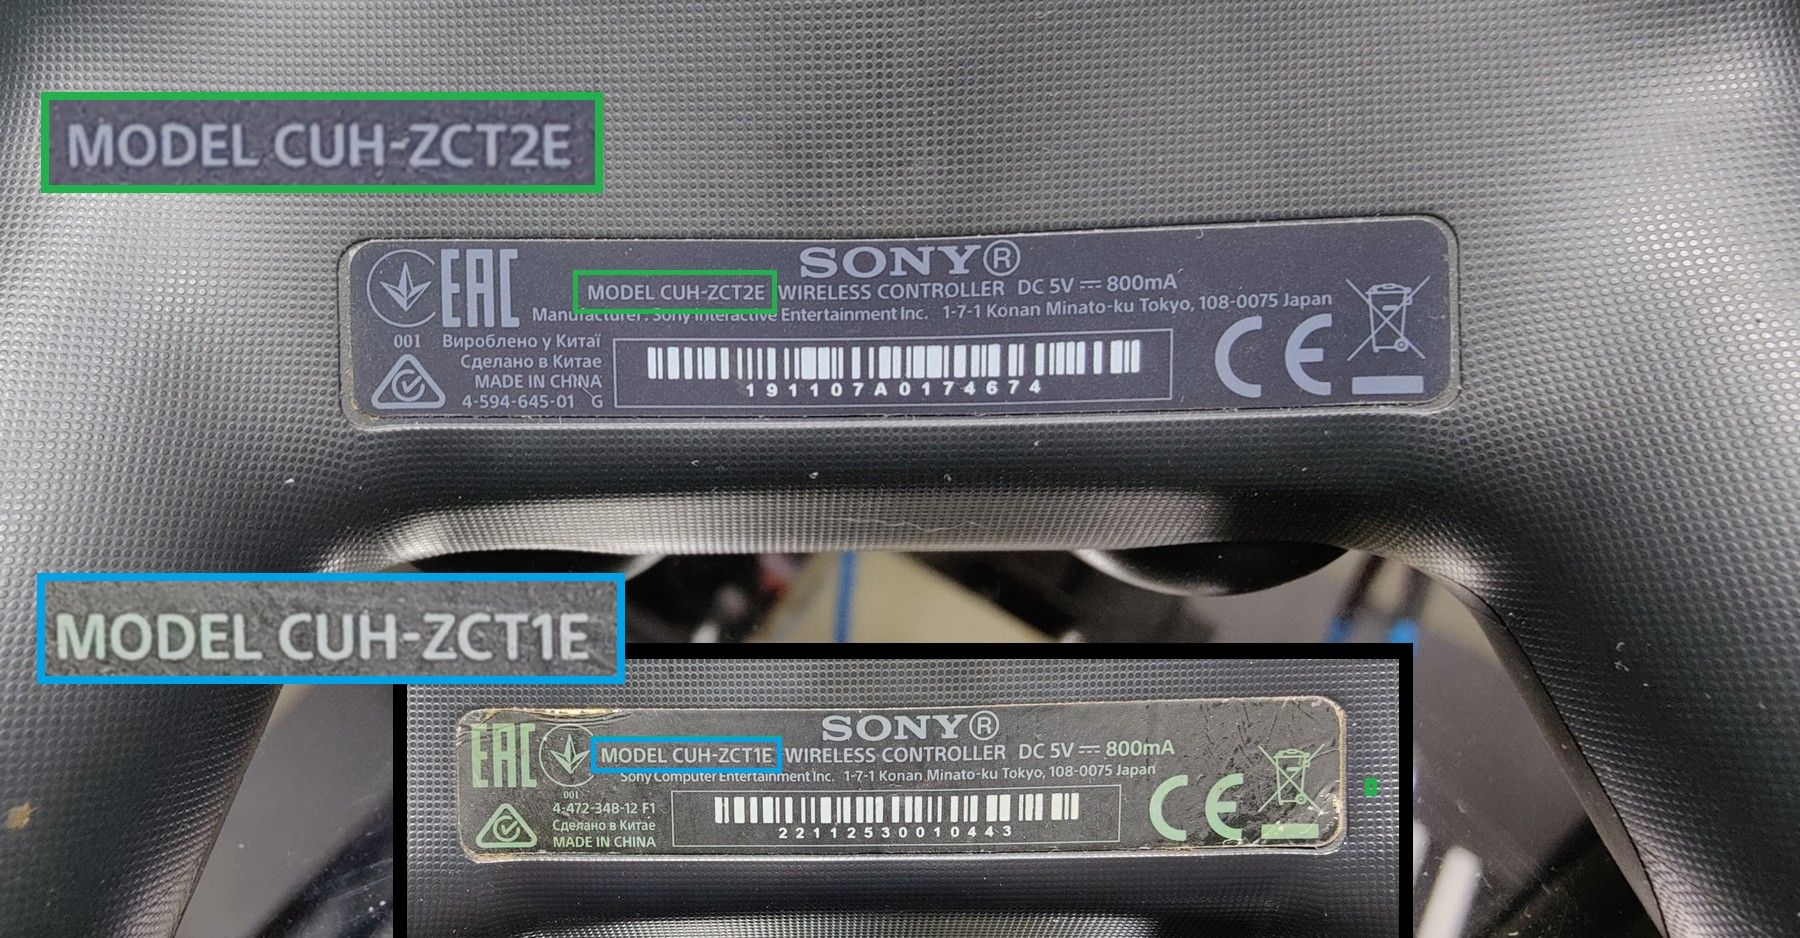
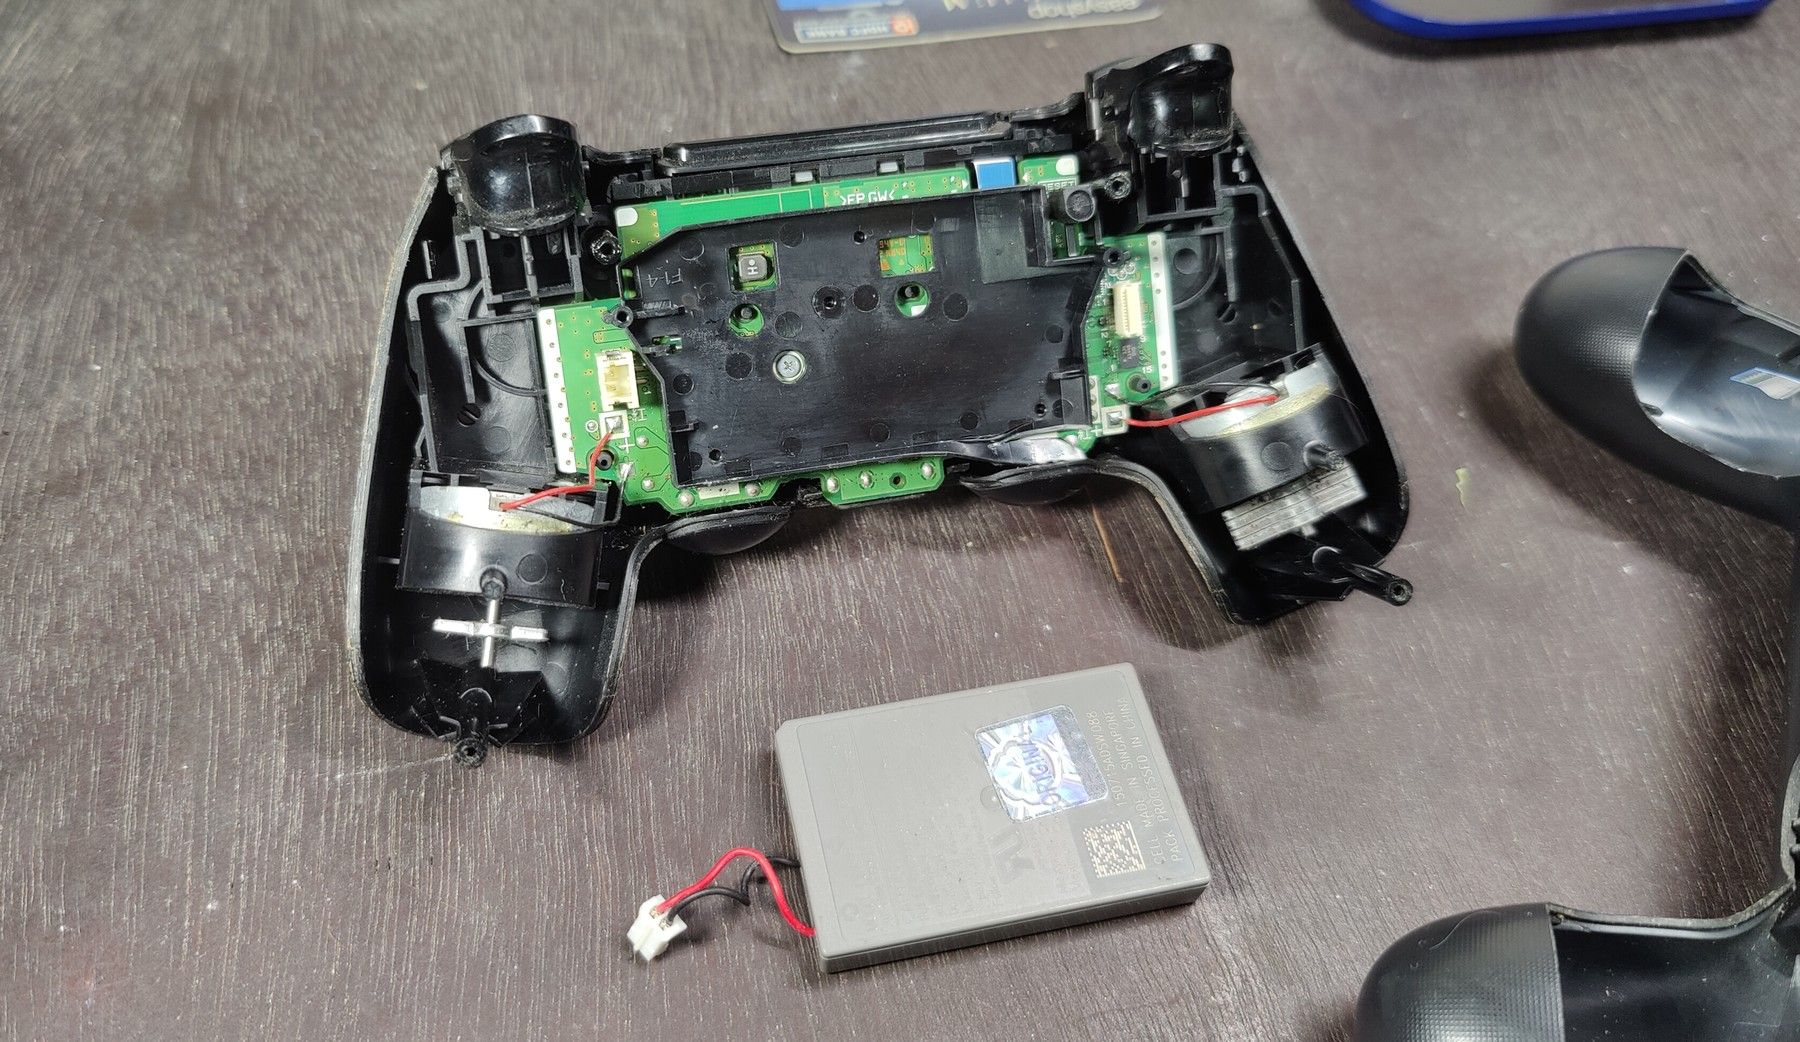
Pay attention to battery compatibility. DualShock 4 controllers manufactured after 2016 utilize a different battery connector. Verifying this is easy once you identify the model number of your controller. This is specified on the compliance sticker at the rear, as highlighted in the image above.
Controllers manufactured prior to 2016 bear model numbers starting with CUH-ZCT1 (purchase battery here), while newer ones are marked CUH-ZCT2 (purchase battery here). Buying the right battery is as simple as tallying this model number with the details specified on the product listing page.
Tools Needed for Controller Surgery
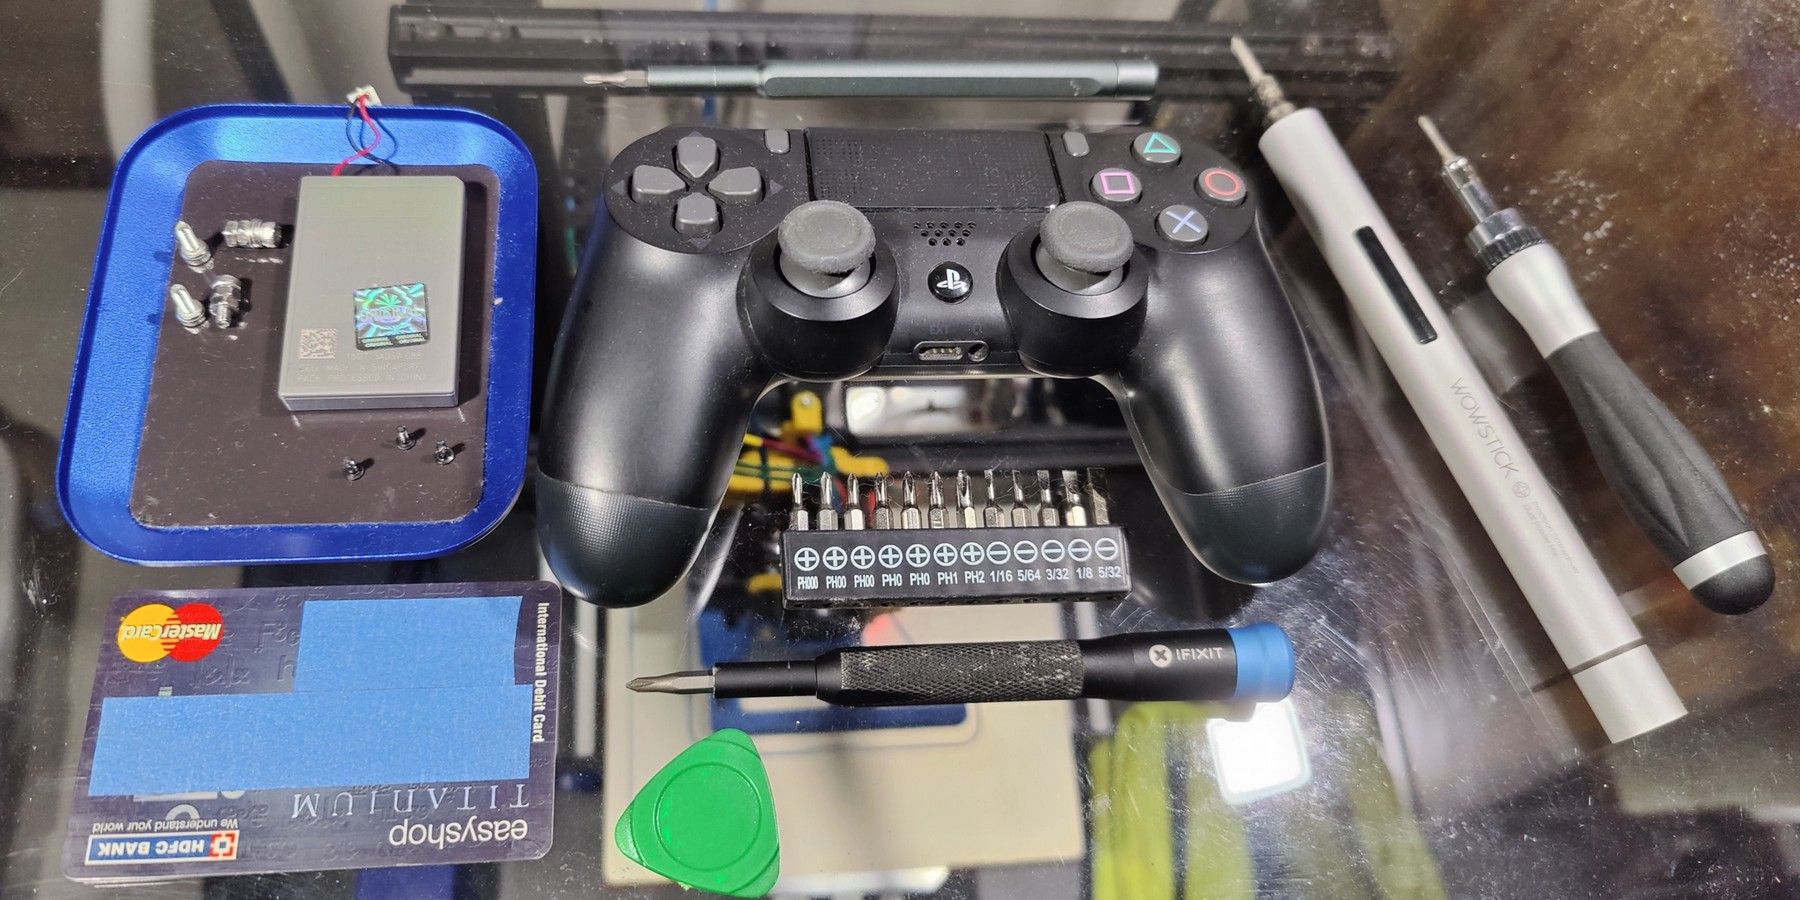
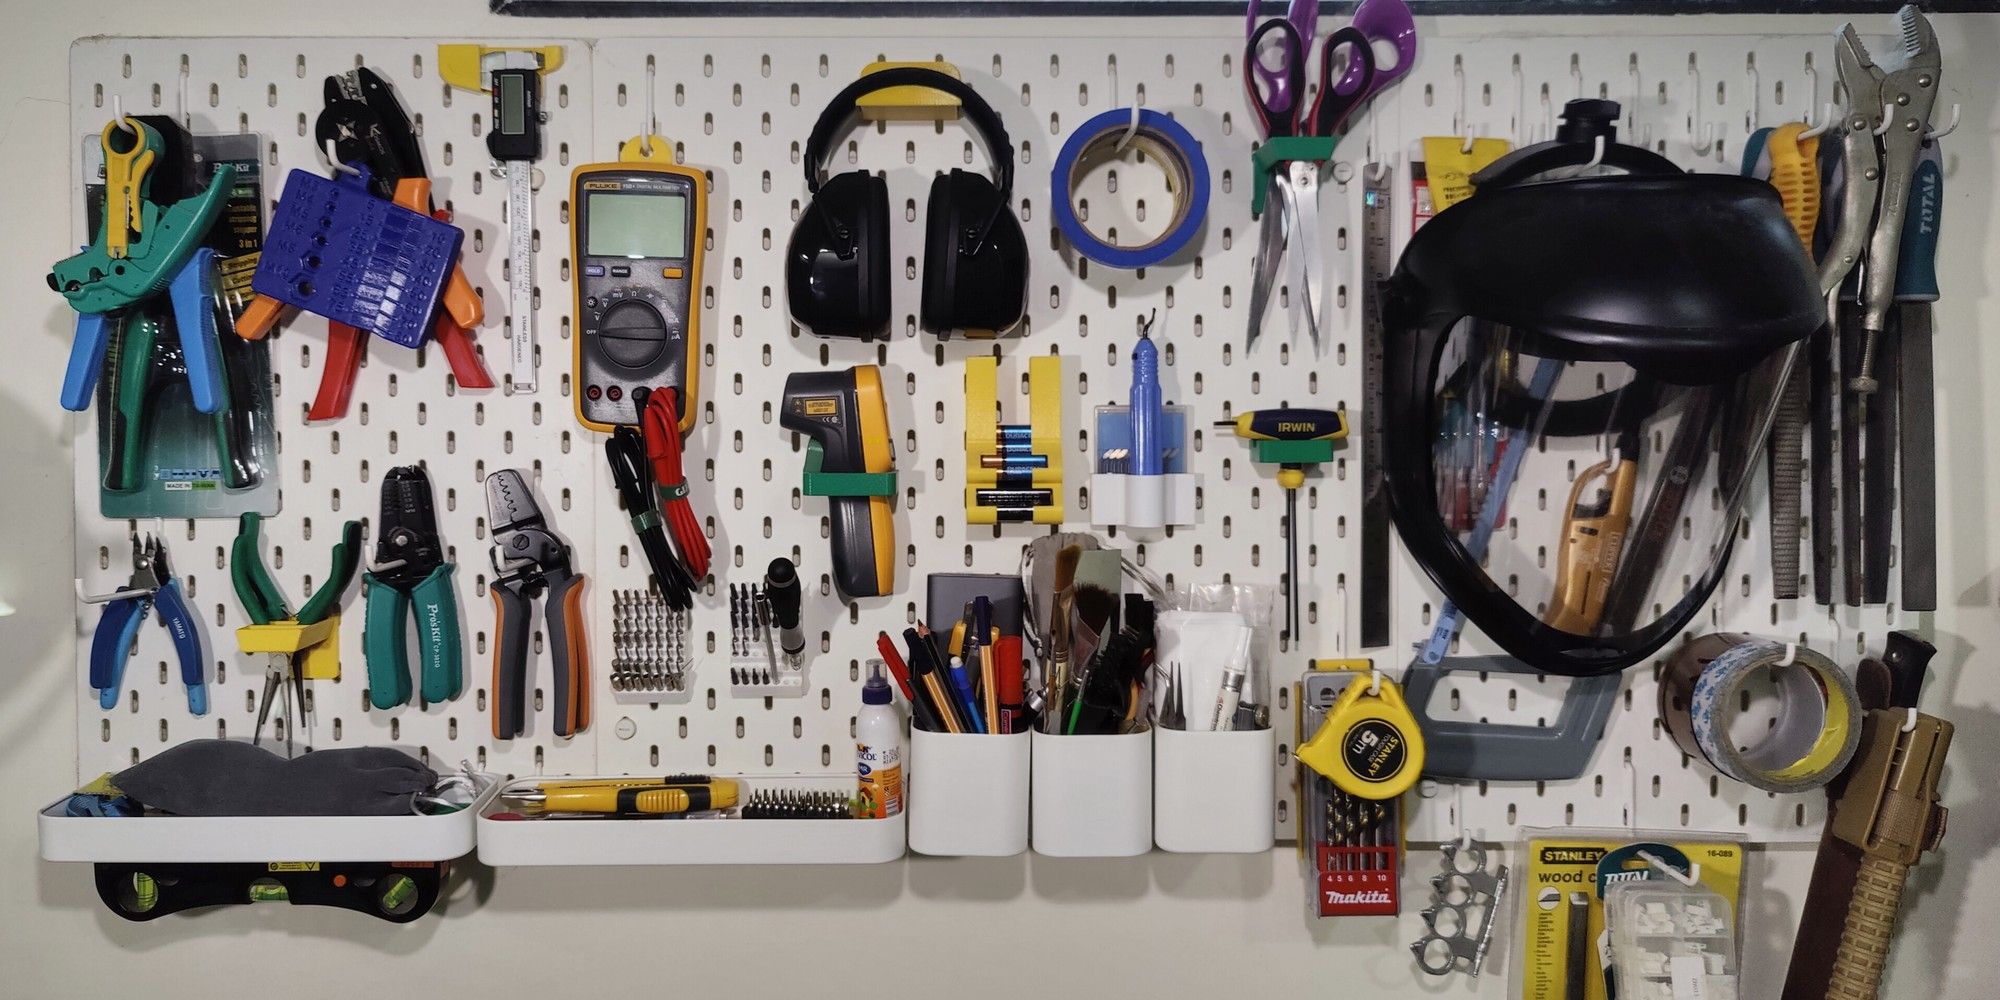
This is a fairly simple procedure that can be carried out with common tools found in a typical household. You absolutely need a Phillips head screwdriver with a #00 size tip. You can also use a #0 tip, but anything smaller or larger runs the risk of stripping the screw heads.
Investing in a good electronics screwdriver kit is a good idea. Such kits usually include plastic pry tools, which make it possible to take apart plastic components without destroying them. However, an old credit or Costco card also works just as well.
A pair of precision tweezers can make life easier, but you can also use your nails in a pinch. A magnetic tray or something to hold screws and small components prevents them from rolling away into oblivion.
Step 1: Remove the Screws
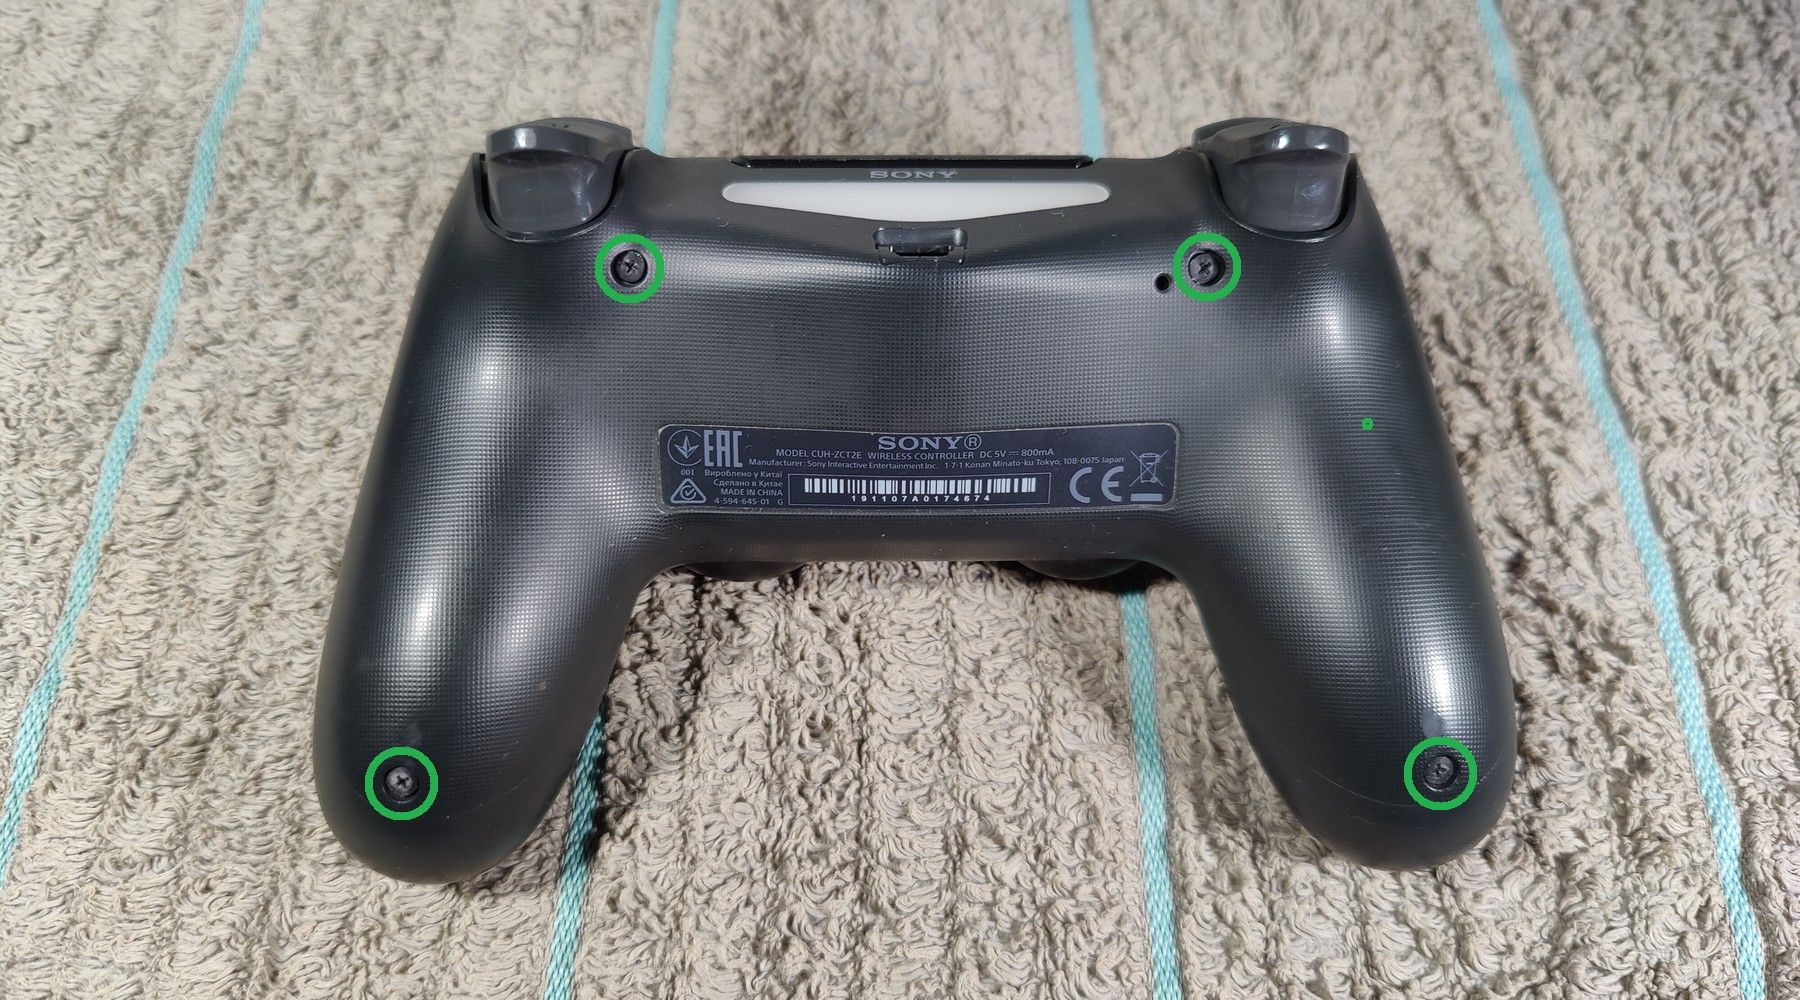
Remove four screws from the locations highlighted in the image above. The screw bosses don’t have metal inserts, so be gentle while tightening and loosening the screws. There's a risk of stripping the injection-molded plastic bosses.
All screws have the same size, so you don’t have to keep a track of their location. It’s safer if you use a magnetic tray or a container to hold the screws.
Step 2: Pry the Chassis Open
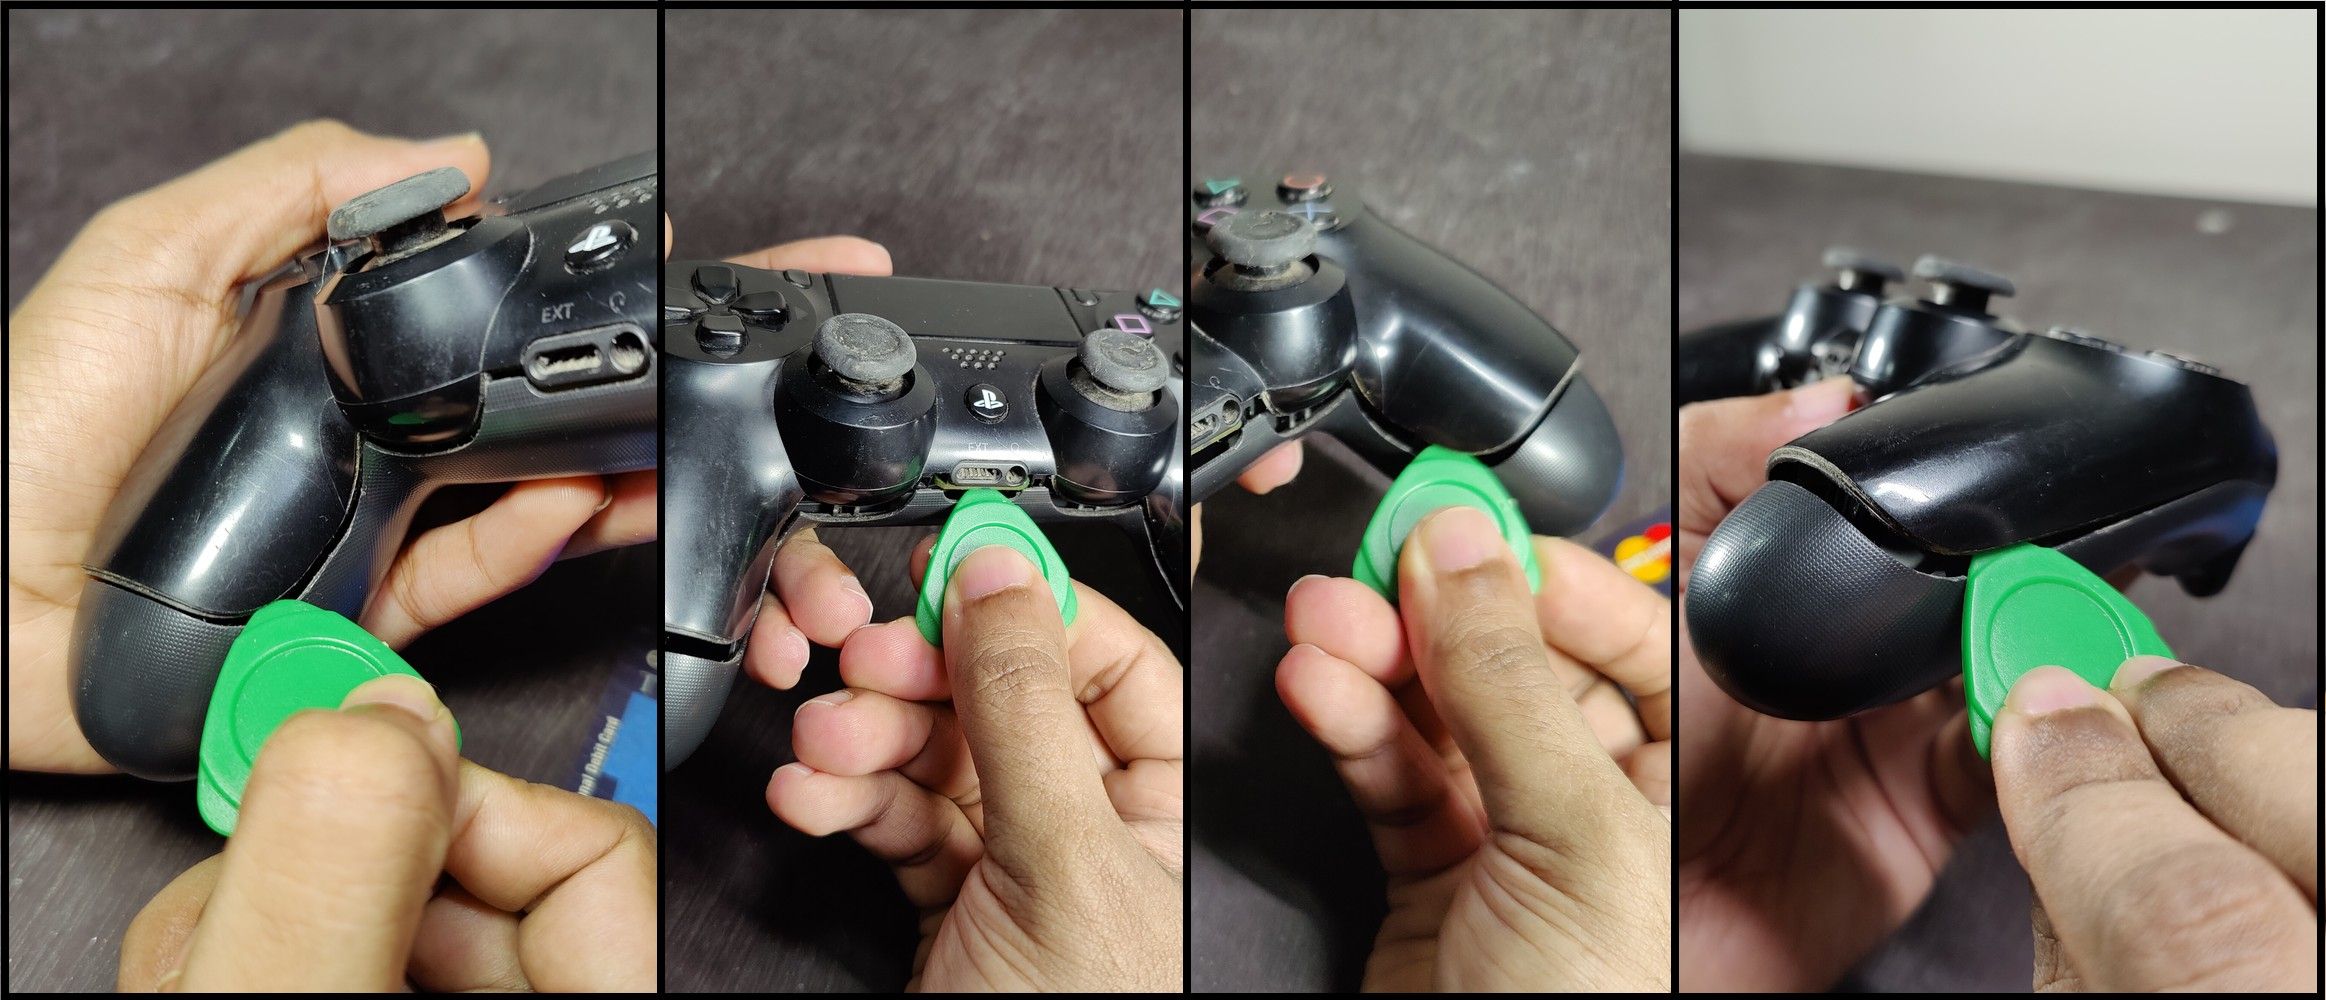
Insert a plastic pry tool (or an old credit card) in the crease between the top and bottom halves of the controller’s chassis. Continue across the length of the seam, sliding the pry tool onwards to detach the retention tabs and separate the two halves.
Do this until you reach the index triggers (either L1, L2 or R1, R2).
It is important to use a plastic tool for this purpose. It might be tempting to use a flathead screwdriver, but that will permanently damage the softer plastic parts.
Step 3: Mind the Index Triggers
Control the urge to race along the seams with the pry tool once the chassis begins to comes apart and stop when you reach the index triggers. That’s because the analog triggers (L2 and R2) house embedded springs that can come flying off if you aren’t careful.
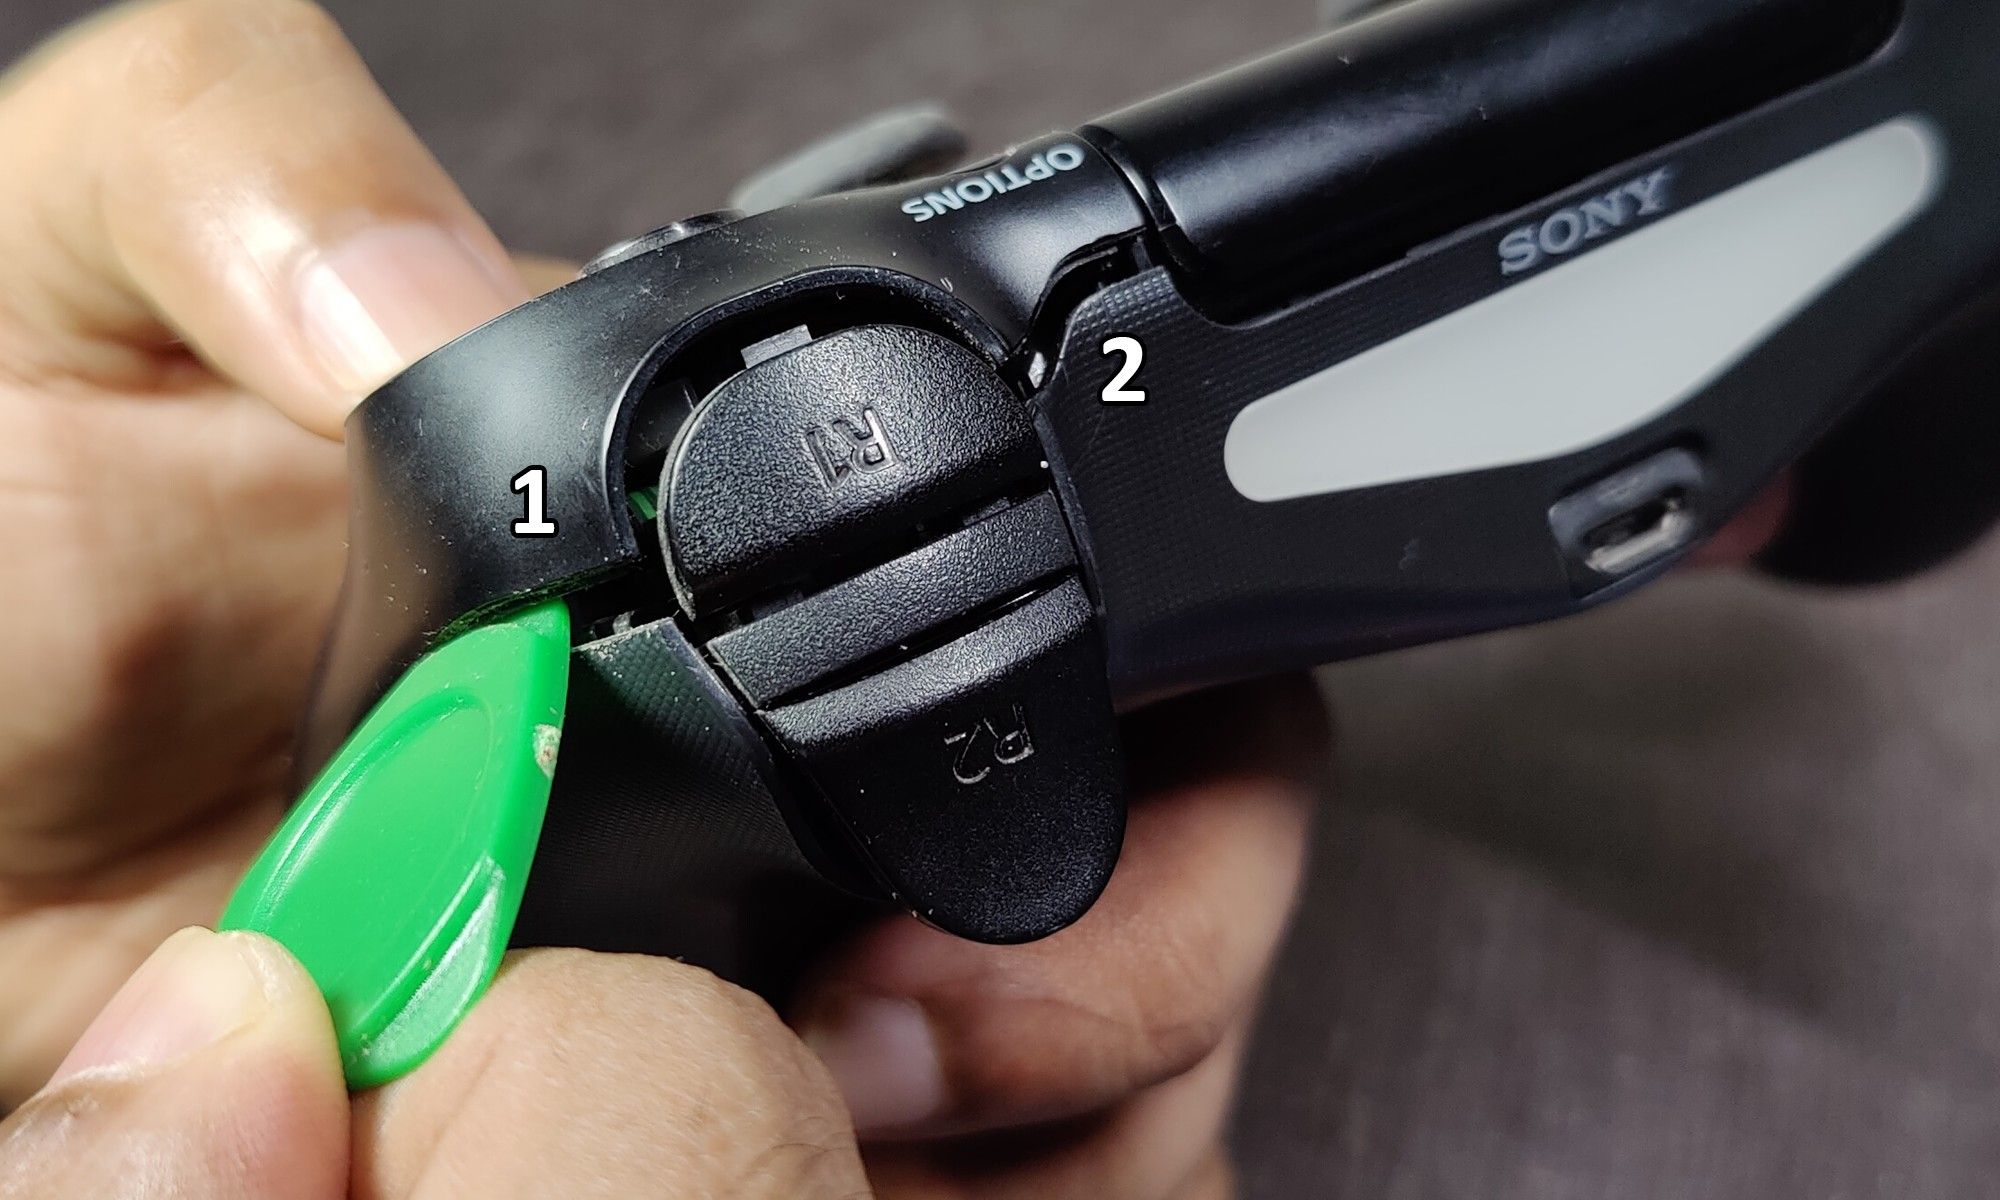
Gently pry off the retention tabs along the two points on either side of the index triggers (highlighted in the image above) to safely decouple the two halves of the chassis. The two pieces can now be separated.
But don’t do that just yet!
Step 4: Ease Out the Bottom Half
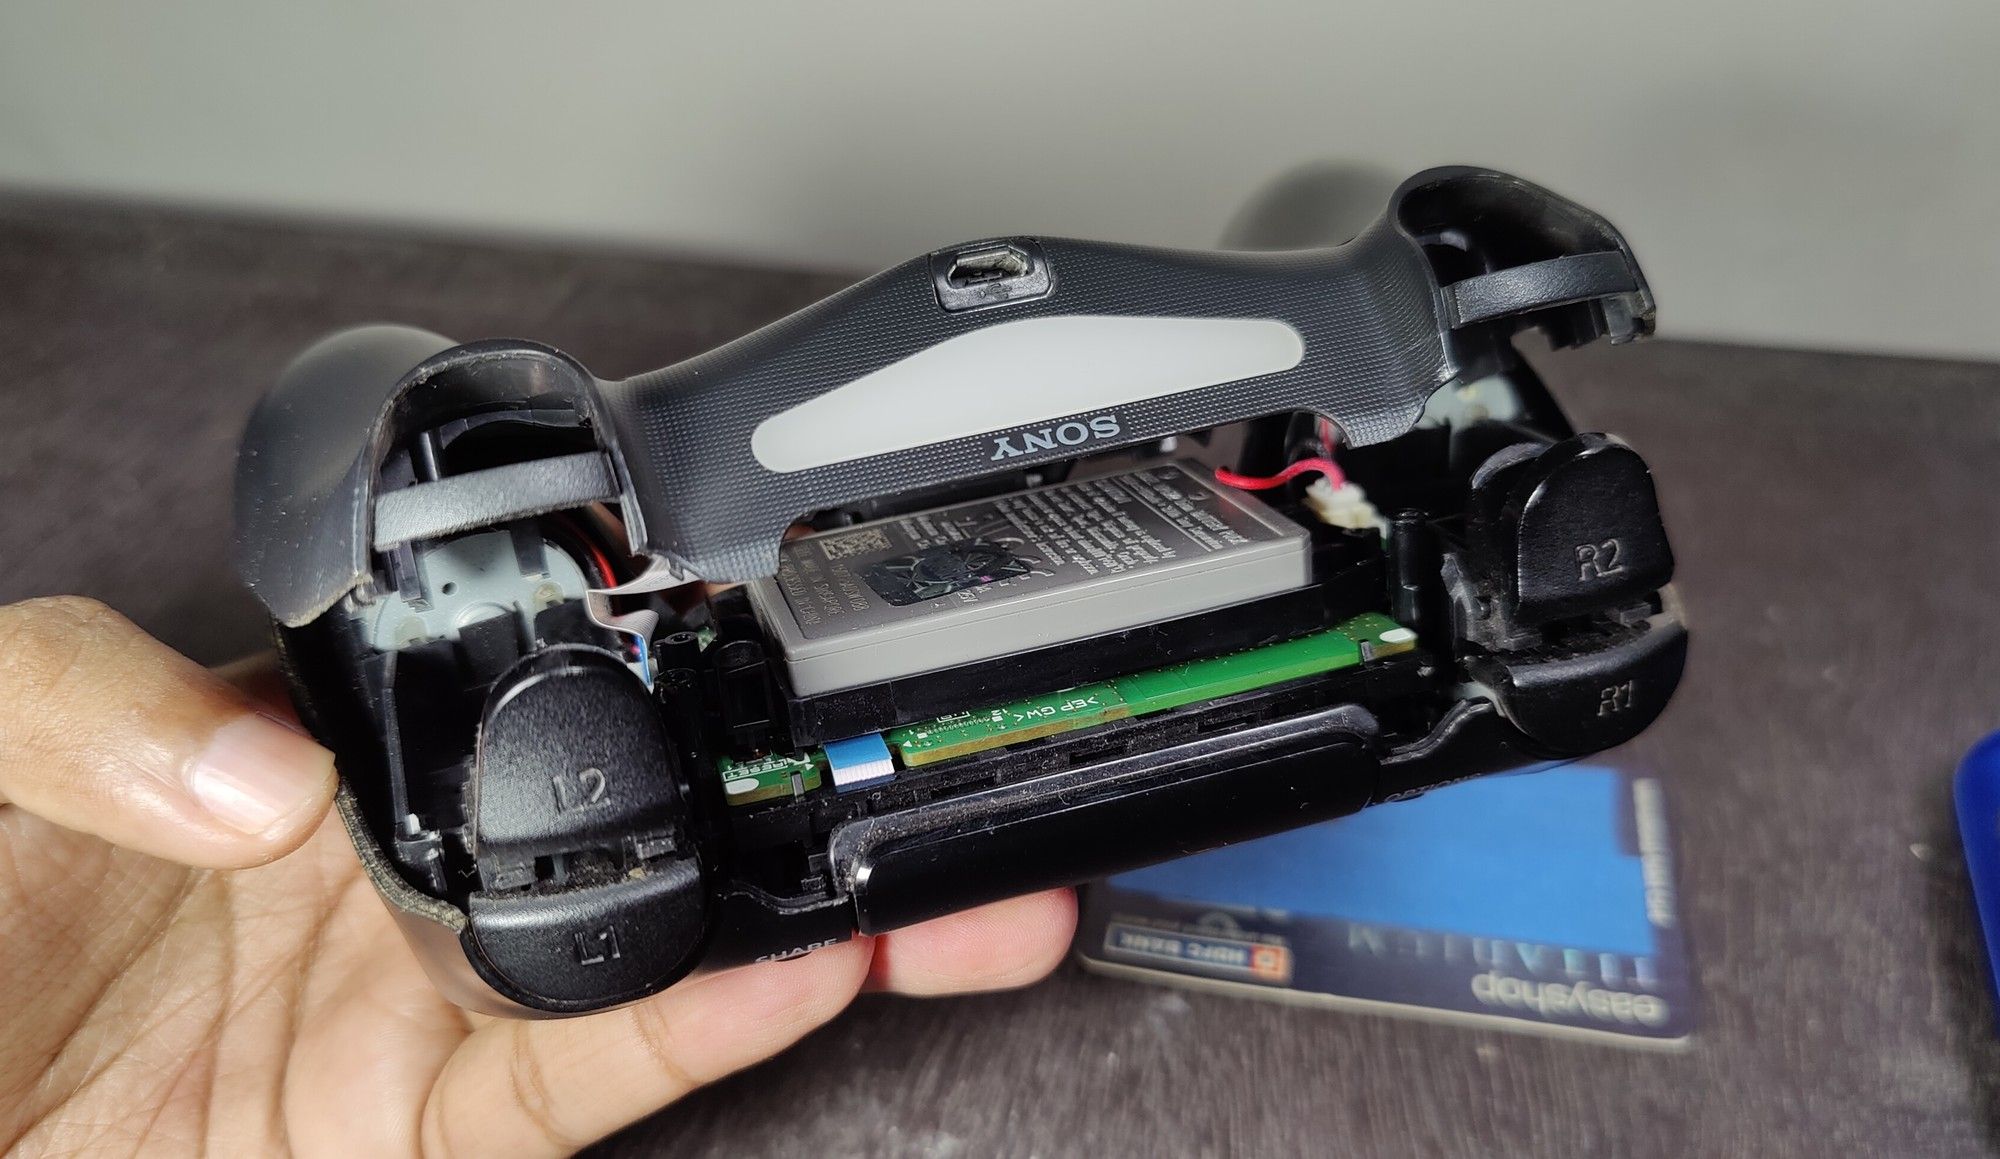
The bottom half of the controller chassis has cross members that occupy the gaps between the top and bottom index triggers on either sides. These cross members can dislocate or otherwise damage the bottom analog index triggers while separating the chassis.
You can avoid this by simultaneously depressing both analog triggers (L2 and R2) to widen the gap between them and the top index triggers. This should provide enough wiggle room to gently slide the bottom half off without the cross members snagging against the analog triggers.
Step 5: Pull Out the Flexible Flat Cable
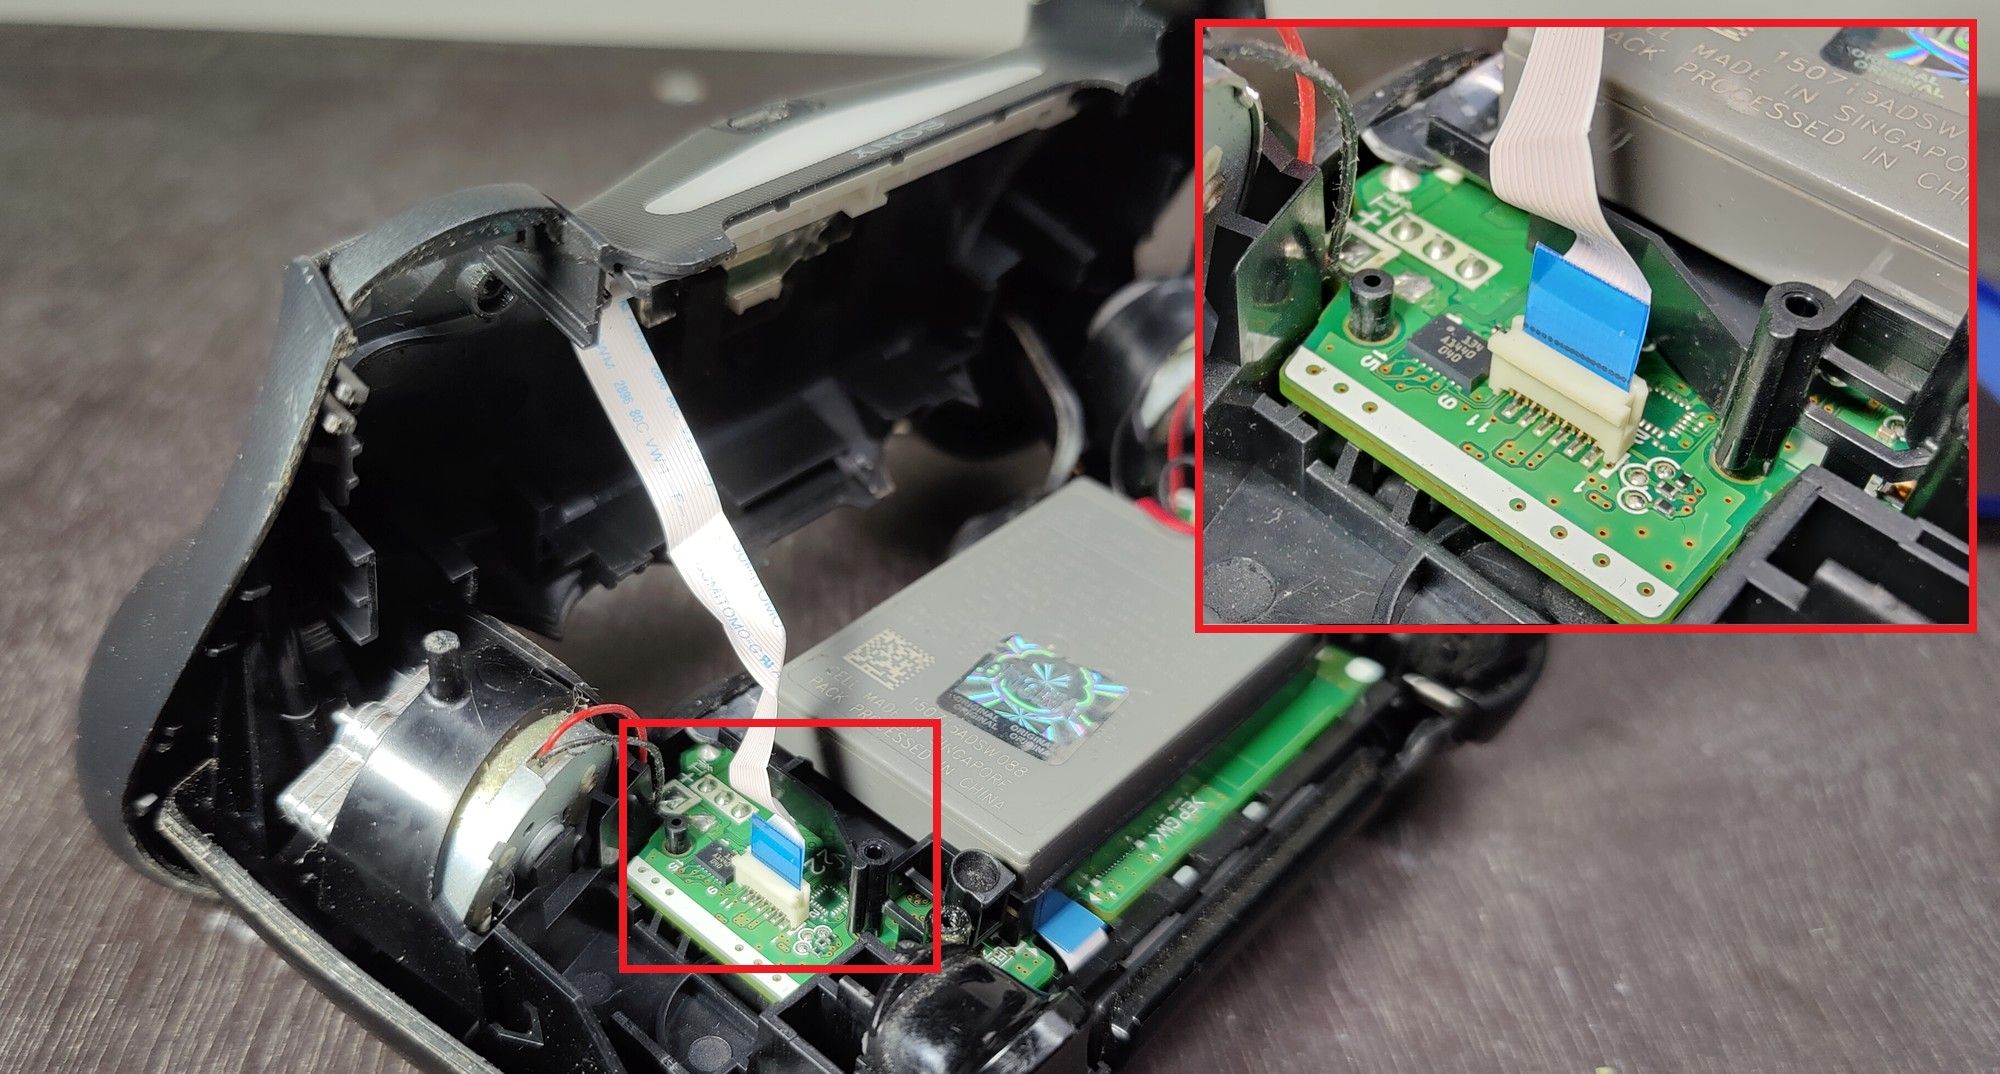
At this point, the two halves of the chassis are held together only by the Flexible Flat Cable (FFC) (also known as the ribbon cable) connecting the mainboard to a daughterboard that houses the USB charging port. Make a note of the cable’s orientation, because there’s no mechanism preventing you from inserting it the wrong way during reassembly.
The blue pull tab should face away from the battery. You also want to grip the same rigid tab while removing and reinserting the FFC for better leverage. Pushing the cable in by itself runs the risk of bending and damaging internal copper traces.
Step 6: Remove the Battery Connector
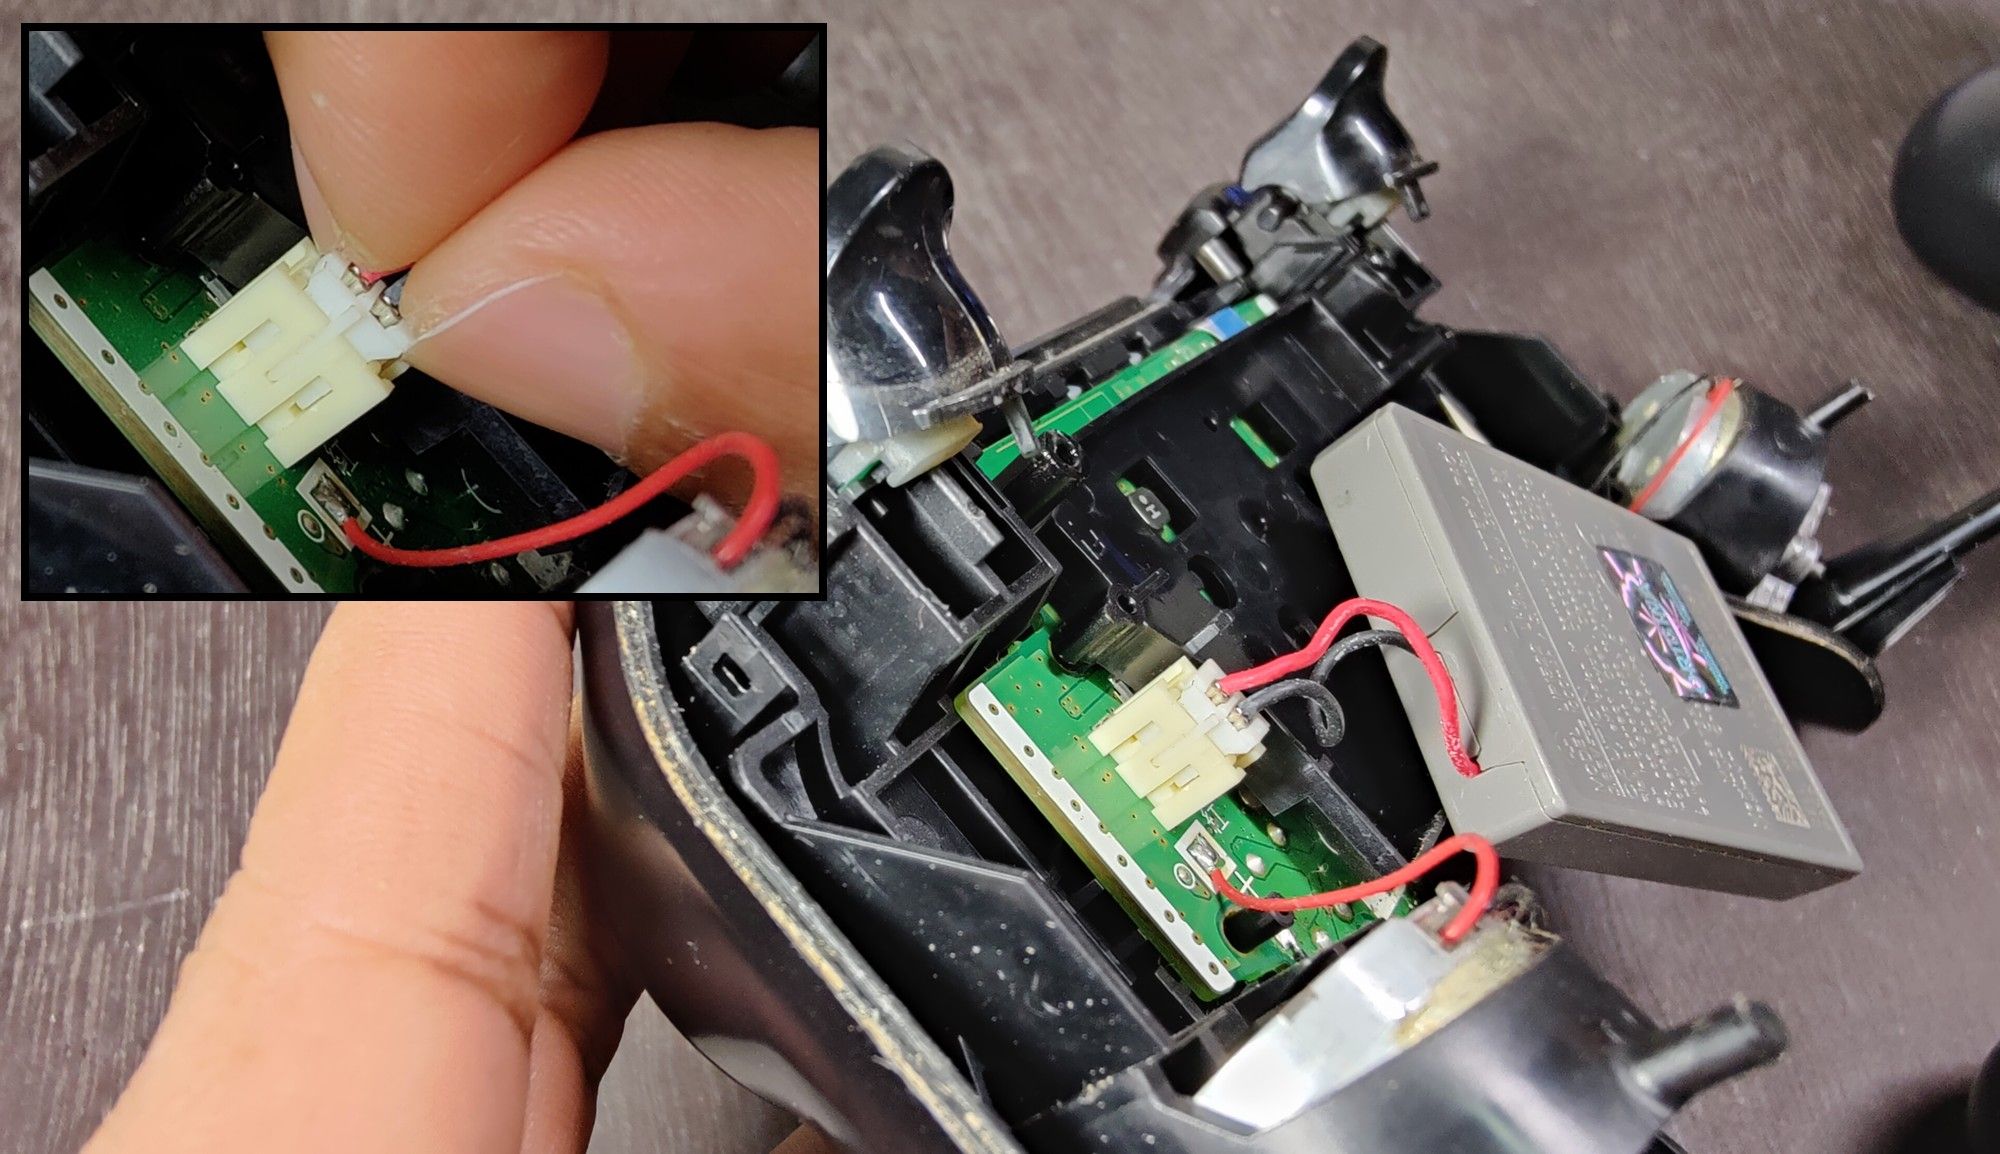
With the DualShock 4 chassis split in two, you now have better access to the battery compartment. You can either use your nails or precision tweezers to pry off the battery’s JST power connector off the mainboard. Resist the urge to tug at the wires to remove the connector.
Step 7: Compare and Verify Battery Terminals
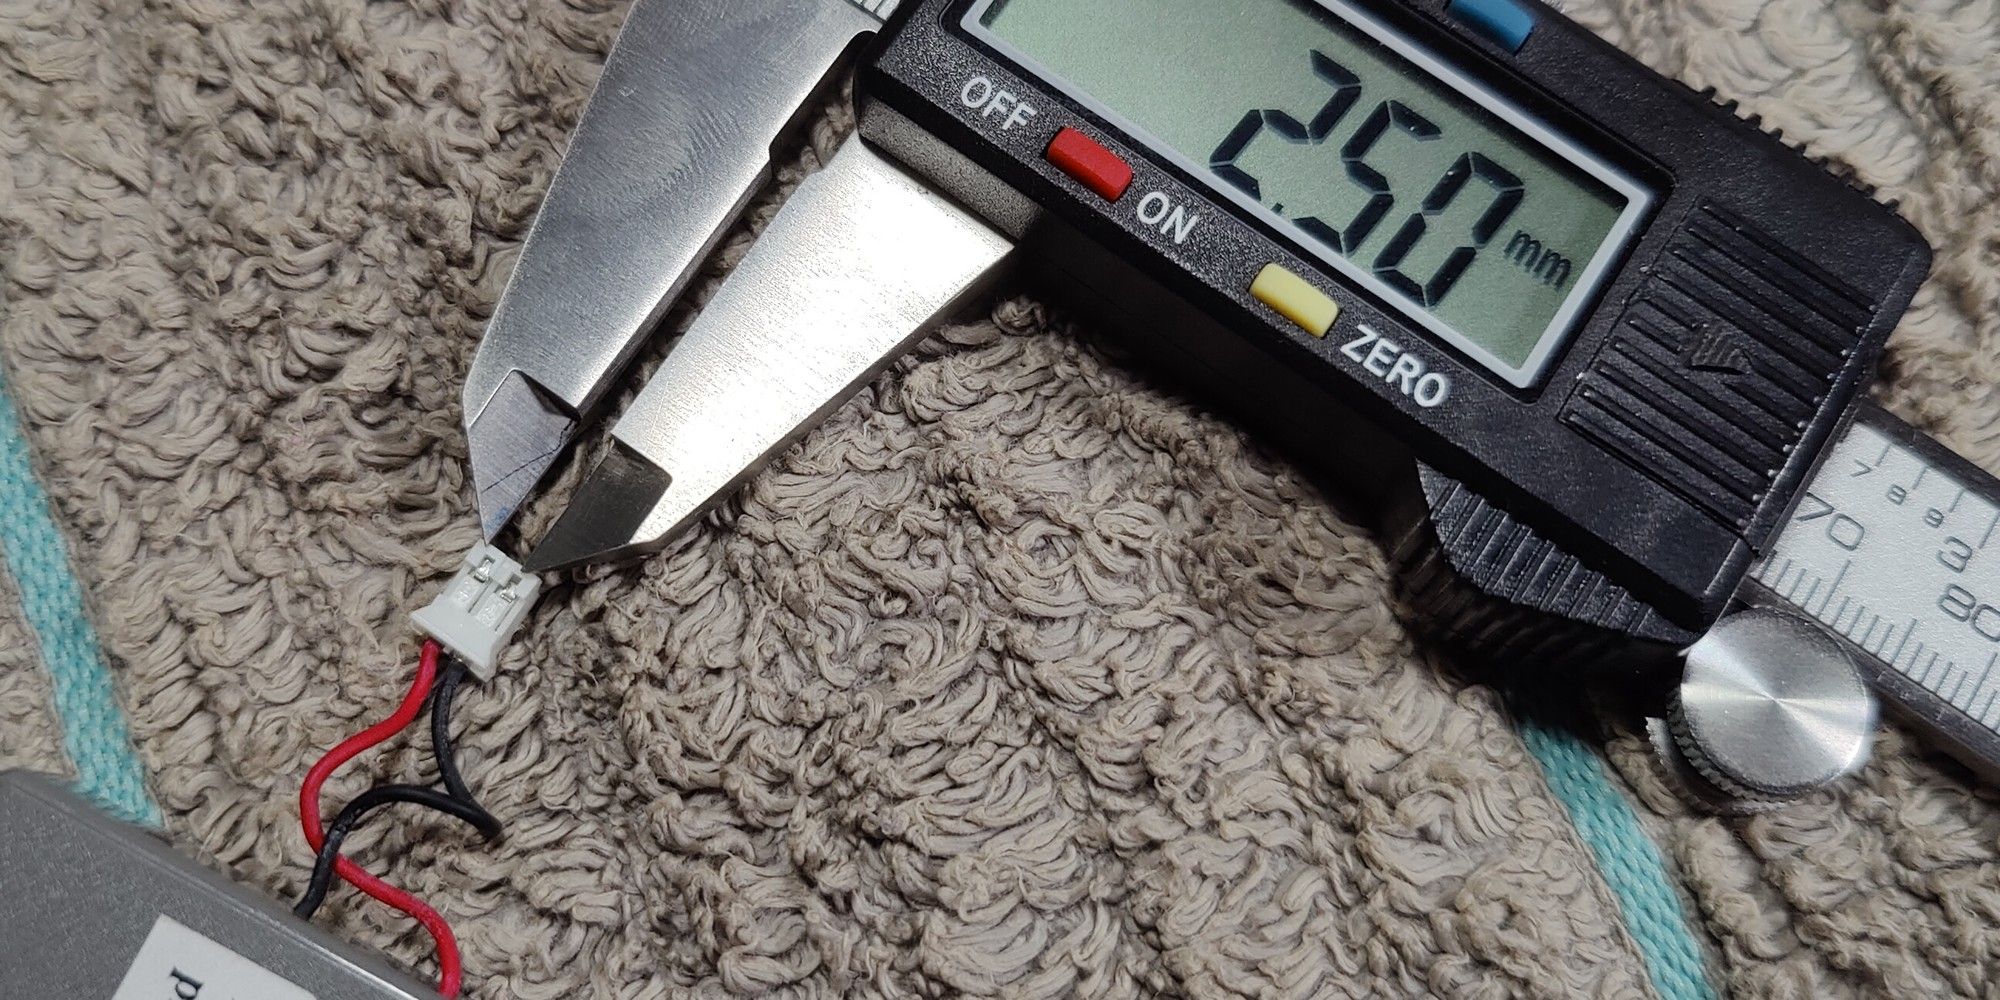
Now would be a good time to triple-check whether you have the right replacement battery at hand by comparing the size of the connectors attached to the ends of both batteries.
The newer CUH-ZCT2 series of controllers only accept batteries terminated in the smaller 1.25 mm pitch JST PH connectors, whereas the batteries for the older CUH-ZCT1 series are terminated in 2.5 mm pitch JST XH connectors.
These JST connectors aren’t interchangeable. You’re better off exchanging the battery for the correct model if you inadvertently purchased the wrong kind.
Unless, of course, you have access to a JST crimping tool and an appropriate connector kit. But that’s a story for another guide.
Step 8: Replace the Battery
Installing the new battery is easy because the JST connectors are keyed and cannot be inserted the wrong way.
Step 9: Reassembly
Reassembly is the opposite of disassembly. Trace back the steps shown in this guide and you’ll have your controller back in action and ready to take on a fresh charge.
Making the Most of Your Right to Repair
While consumer electronics brands love making battery replacement progressively more difficult with each new product release, the onus lies on you as a consumer to fight back.
More often than not, a simple screwdriver and a can-do attitude is all you need to do just that.
Comments
Post a Comment