Data imported from external sources might require some cleaning up. With the help of delimiters, you can split such data into different cells to organize it better and make it more meaningful.
A delimiter separates each part of data within that string. The delimiter can be any character like a comma, space, tab, or semicolon. However, splitting data into their cells in Excel is not that simple. So, let's look at how to manipulate data with the help of delimiters in a spreadsheet.
Select Your Data
Before you get started, you'll need to select all the data you want to use. Here's how to do this:
- Open a new Excel sheet. Enter sample data into the first column of the sheet.
- Type a list of names of a few singers and try to split these names into first names and last names into separate cells.
- Select the data you want to separate using your mouse or the Ctrl and Down arrow keys.
Using the Text to Columns Option
Once the data is selected, you can split the names into first and last names. Let's see how!
- Click on the Data option from the Excel ribbon.
- Click on the Text to Columns icon in the Data Tools section of the Ribbon.
- When you select Text to Columns, the Convert Text to Columns Wizard will open on the screen. The wizard will help you split the text in three steps.
- Select the Delimited option and press the Next button.
- On the next screen, select Space as the delimiter, and uncheck any other delimiters.
- Once done, press the Next button. The Data preview window will show how Excel will split the data.
- You can choose the Destination where you wish to save the output data. MS Excel takes the first cell of the selected data as the Destination. However, for a filled sheet, you must remember to select the Destination cell. Otherwise, Excel will overwrite your original data. Do note that if your data changes, you'll need to do the text delimitation again.
-
- Once done, click on the Finish option. Excel will split the data into two columns with the first names and last names.
A delimiter helps to set up the point where you can split any text. A "space" is just one type of a simple delimiter. For first, middle, and last names, the data can be split into three columns.
Similarly, other types of delimiters can help you split data that may not have spaces. Let's take a look at them in the next section.
Types of Delimiters
Other delimiters apart from the Space delimiter that you can use on data strings are the Comma, Semicolon, Tab, and Other. We already saw the Space delimiter when we learned to use the Text to Columns option. Here, we will see how to work with the Comma, Semicolon, and Other delimiters.
Comma
Let's say we have a data list of five friends and the country they live. We can split their names and their country into different columns using the comma delimiter.

- Select all the data and click on the Data option from the top of the screen.
- Click on the Text to Columns option from the Data Tools group on top of the Excel sheet. A wizard window will appear on the screen.
- Select the Delimited option and press the Next button.
- This time, choose Comma as the delimiter and click on the Next option given.
- The Data preview window shows you how Excel will split the data. You can choose the Destination where you wish to save the output data.
- Once done, click on the Finish button to separate the data into columns.
Semicolon
Here's a small dataset of students' registration numbers, along with their ages. You can split the student's registration numbers and their ages into different columns using the Semicolon delimiters.

From the second step of the wizard, select Semicolon as the delimiter.
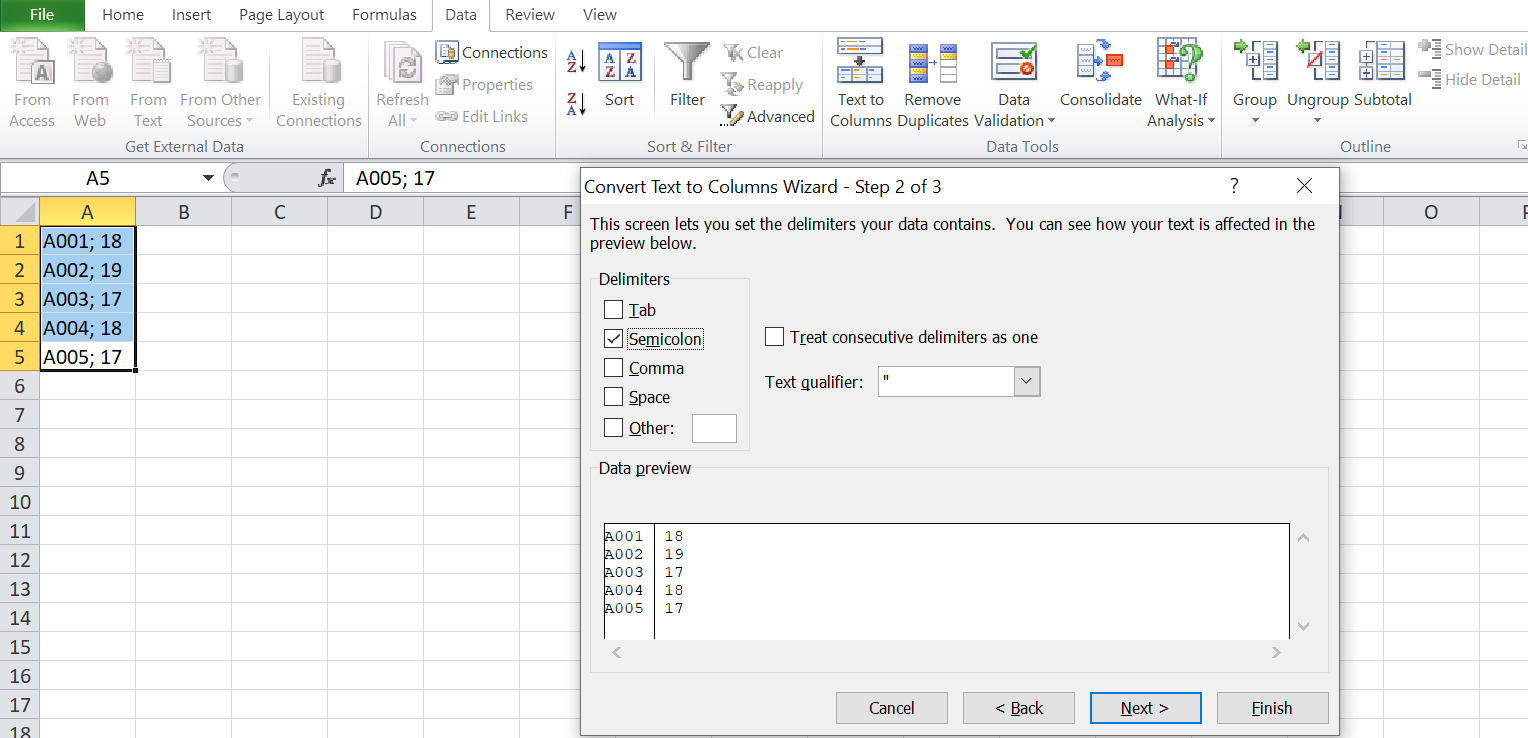
As you can see on the screen below, the delimiter splits the student's registration number and ages into separate columns.

Other
Text to Columns option also allows you to choose your delimiter to split any text string through the Other delimiter. For instance, you can use it to split email addresses into usernames and domain names separated by the @ sign.
For our sample, we have a list of email IDs. You can split the usernames and domain names into different columns using the Other delimiters option.

Here again, you'll need to select the Other option as the delimiter on the second page of the configuring wizard.
- Select Other as the delimiter parameter.
- Uncheck the other delimiters.
- Enter the @ sign, in the box beside the Other option.
- Click the Next button once done.
- Use the Data Preview window to see how Excel will split the data.
- Choose the destination to save the output data and click on the Finish button. This would split the email address into usernames and domain names on separate cells.
Configure Text to Columns to Make Conversions Easier
You can customize the Text to Columns feature according to the data you want to split.
Text Qualifier
You can let Excel know where a string of text begins and ends with a Text Qualifier symbol. The Text Qualifier treats the data between two text qualifiers as one value irrespective of any delimiters within the text qualifiers. So if the cell value is "Neil, Armstrong", 12, and you specify the apostrophe as a text qualifier and the comma as the delimiter, then Excel will treat Neil Armstrong as one value and 12 as another value. Excel will ignore the comma between "Neil" and "Armstrong."
If no Text Qualifier is specified in the data, all the values will be split into different cells with the comma as the delimiter.
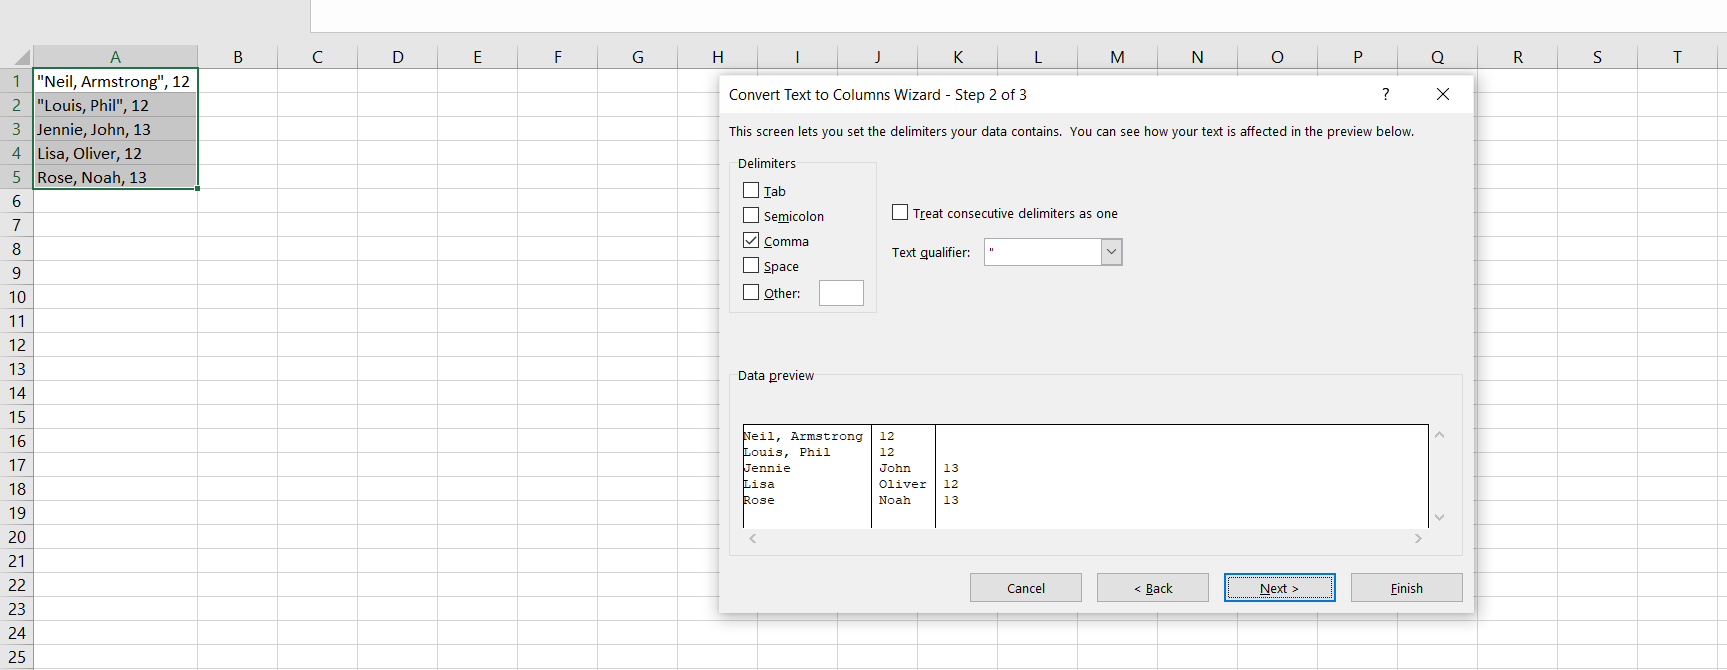
By using a text qualifier, you can tell Excel which symbols mark the beginning and the ending of the information you wish to import in Excel.
Data Preview
The Data preview box shows the final output as it will be separated into different columns on the sheet.
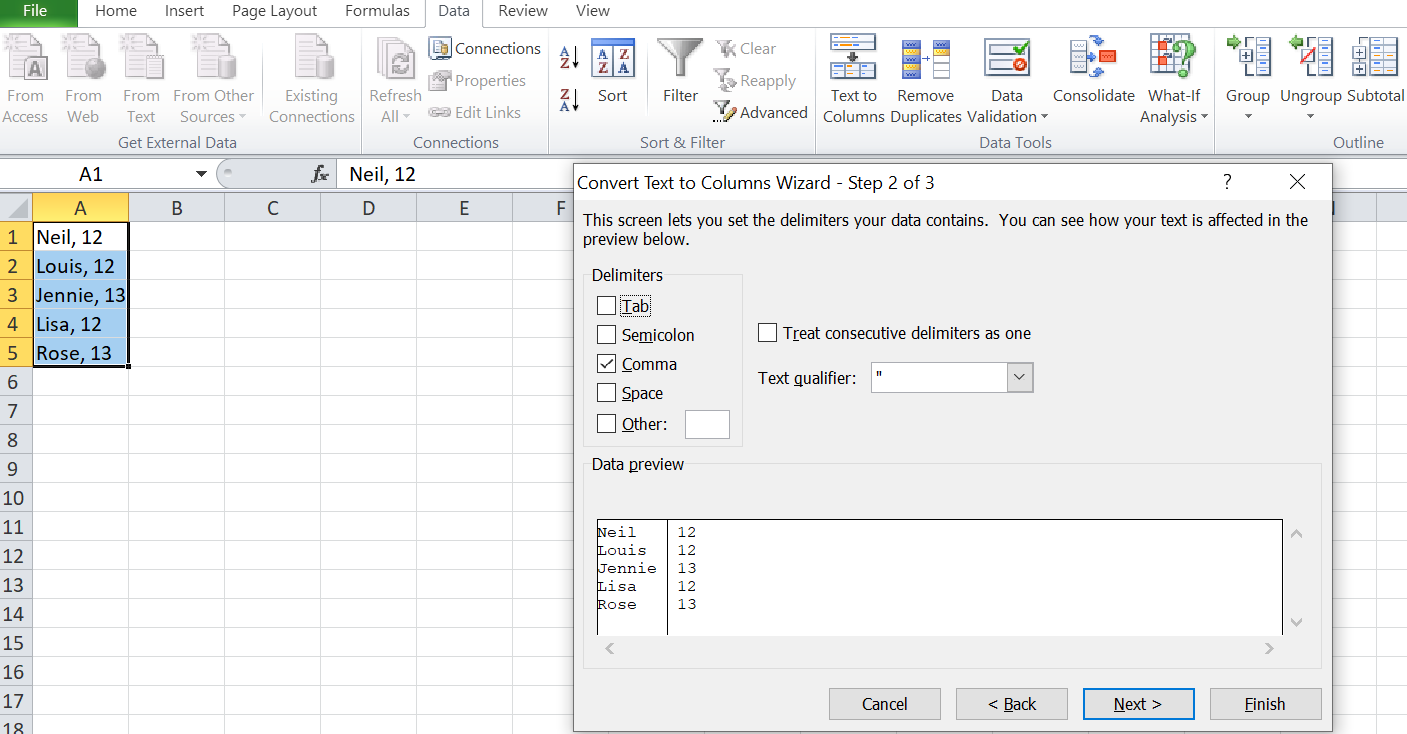
You can use this box to verify your output before you finish converting the text.
Treat Consecutive Delimiters as One
This option is beneficial if your data contains a delimiter of more than one character or if your data contains multiple delimiters. For example, if the cell value is Neil,; Armstrong ,; 12, you can choose to Treat Consecutive Delimiters as One.
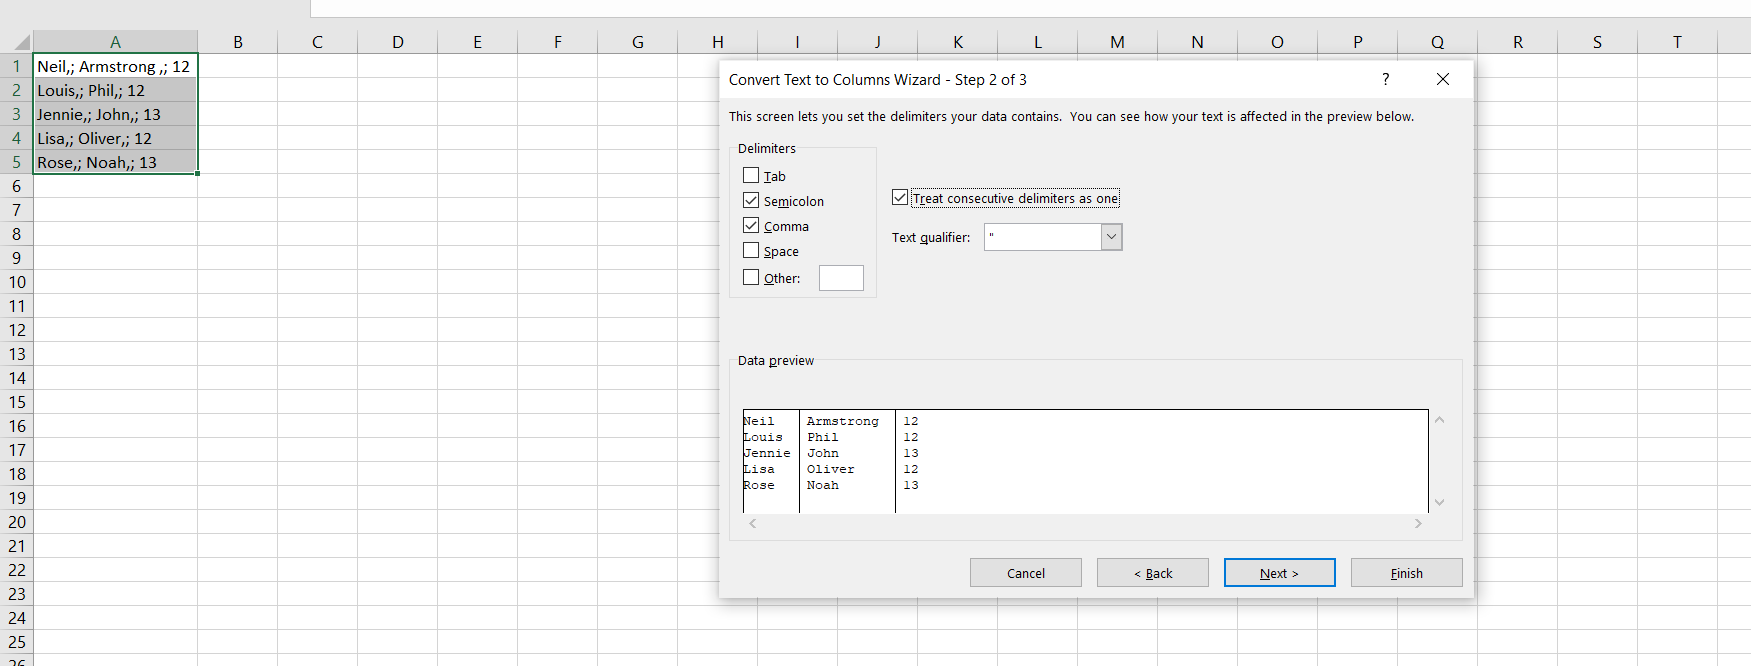
If you don't check this option, MS Excel will consider Semicolon and Comma as two different delimiters and split the cells into five columns.
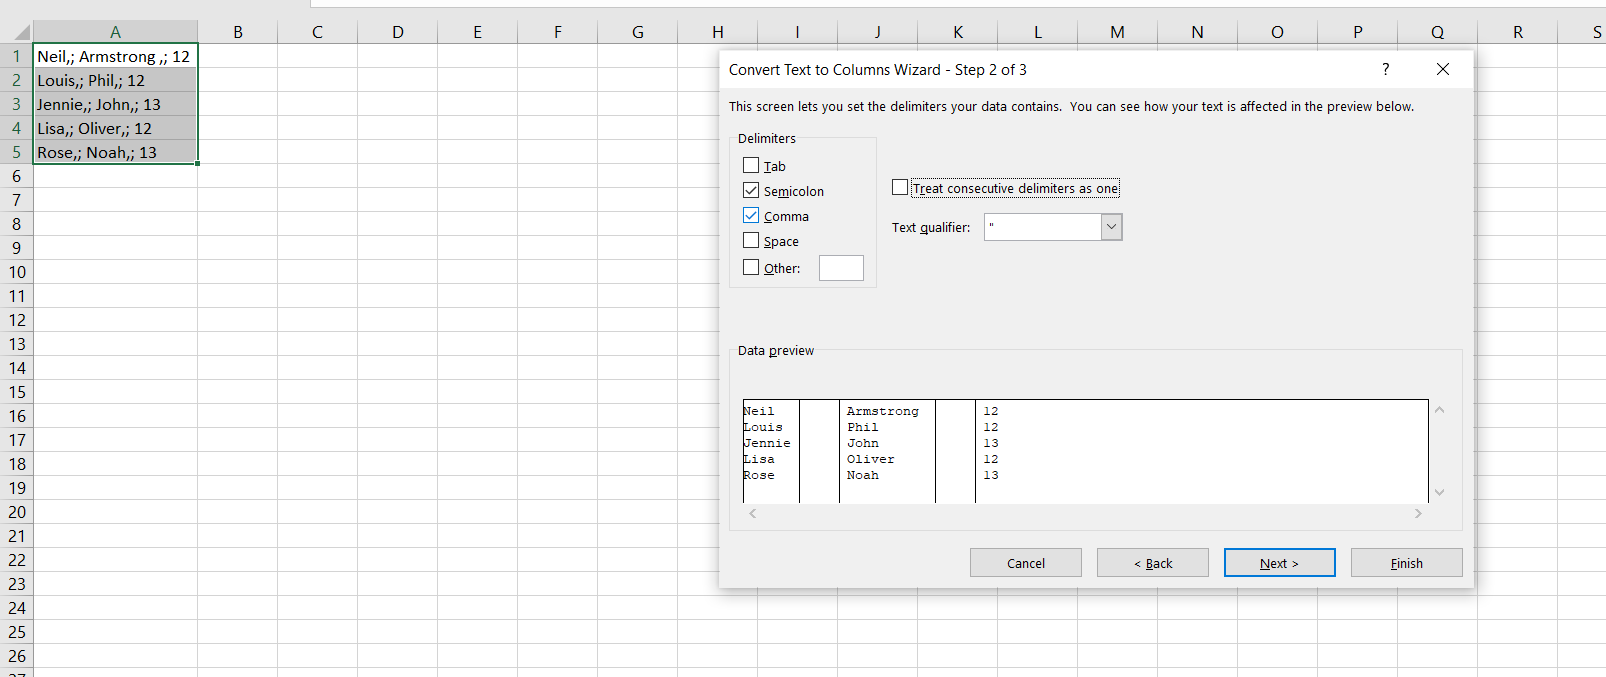
Thus, this feature will save you a lot of trouble when multiple delimiters are present.
Text qualifiers are vital when you want to analyze data that is cumbersome or complex. Delimiters help us to separate the data from one single cell.
After importing your data and decluttering it with delimiters, you might want to split data into separate sheets.
Organizing Data in Excel
Organizing data in MS Excel is a foundational skill. In data analytics, the first step towards making sense of data is by organizing it. And splitting data into separate cells is the first step to achieve this.
Comments
Post a Comment