At first, Facebook Live was available for mobile users only, but now, the service is available for desktop users as well. Using your desktop computer to produce your Facebook Live videos has huge advantages. This gives you access to Live Producer, which opens opportunities for enhancing your live videos.
This guide will take you through the steps needed to set up graphics and text using Facebook’s Live Producer from your desktop. Live Producer gives you the ability to create polls, overlays, questions, live stream management, and more.
What You'll Need
To take advantage of these native tools, you will need an external software or hardware encoder that supports adding a browser source. Open Broadcast Software (OBS) is the encoder that we'll be using in this guide. It's a free and open-source software for video recording and live streaming.
If you wish to use an alternate encoder, don't worry. Most streaming software solutions have similar settings that you can configure in the same way we'll outline in this guide. Be sure to check out Facebook’s list of supported encoders if you wish to use something different.
How to Connect Your Encoder to Facebook Live
Before we get started, you'll need to connect your encoder to Facebook Live. Here, we'll explain how to connect OBS to Facebook Live.
If you haven't already, download OBS. After opening the software, skip the auto-configuration wizard.
Then, go to File > Settings > Output, and select Advanced in the Output Mode dropdown menu. Select an H264 video encoder in the Encoder dropdown. Using a hardware encoder (i.e. NVENC or QuickSync) over the x264 software encoder is recommended.
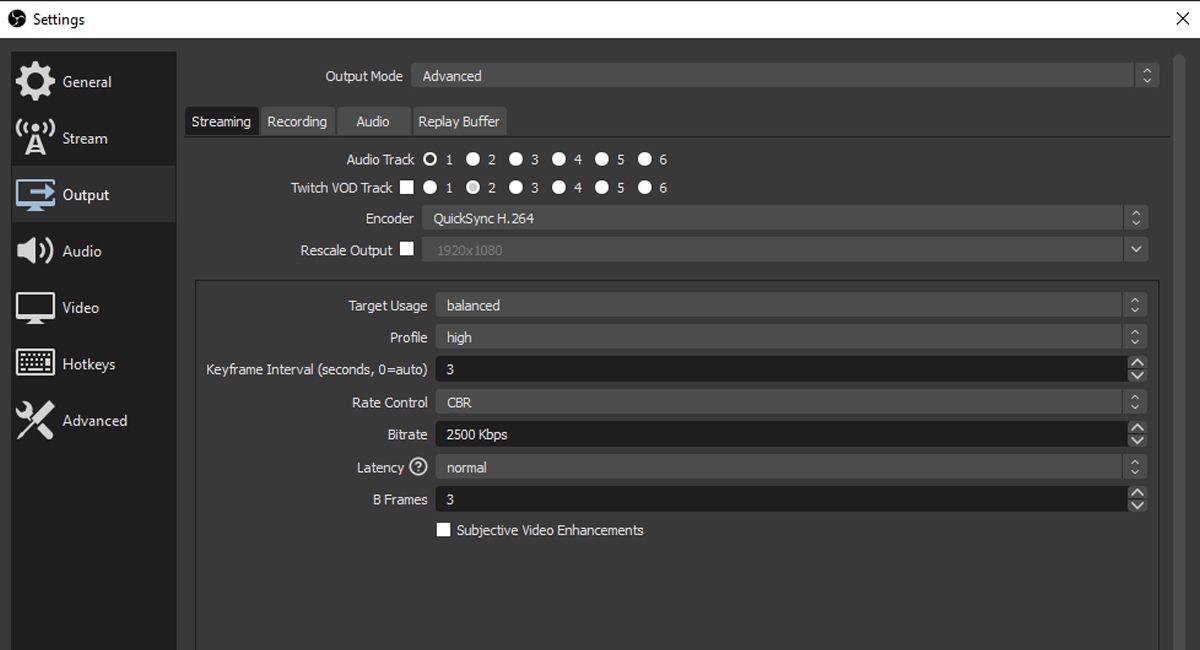
From there, check the upload speed, and subtract about 20 percent to determine the bit rate that you should configure in your streaming software. The recommended bitrate is 4000Kbps (4Mbps).
The Keyframe Interval setting must be set to at least every two seconds throughout the stream. Also, make sure to use H264 encoded video and AAC encoded audio only.
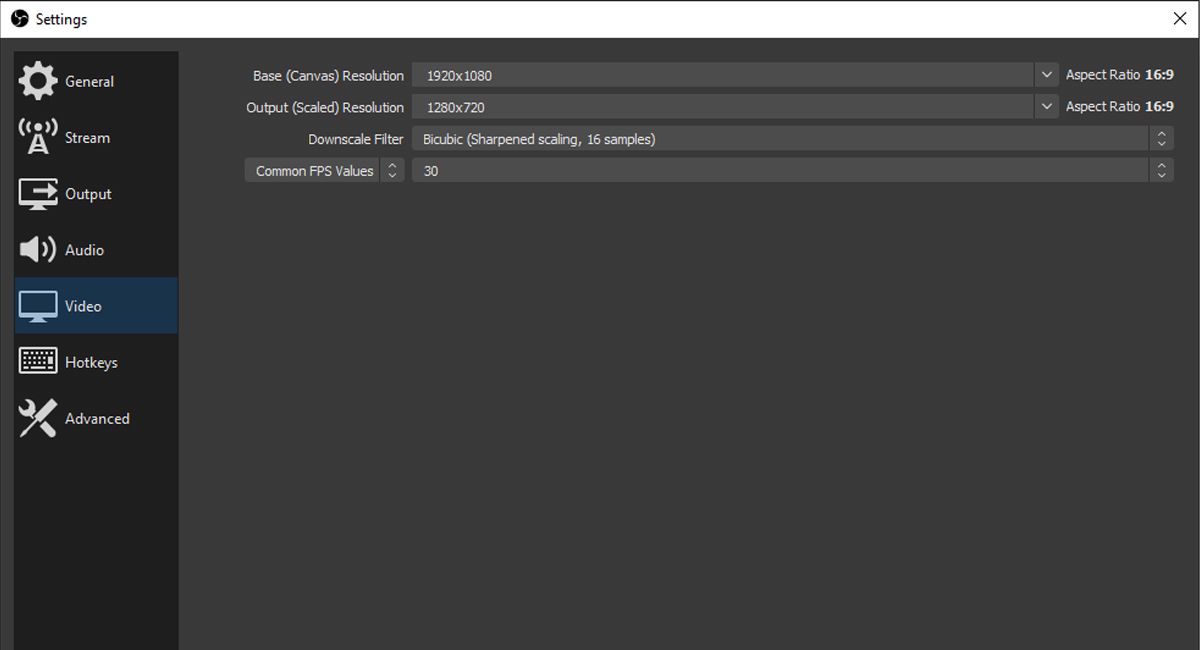
After that, head to Settings > Video to set up your desired resolution and frames per second (FPS). The max supported settings are 720p (1280x720) resolution at 30FPS.
In order to go live, you will need to connect and select at least one video source (i.e. a connected camera, screen share, or pre-recorded file). When you are ready to go live, go to Settings > Stream. Choose Facebook Live as the Service.
Copy and paste your Stream Key from Live Producer and into OBS. You can find this in the Stream Setup section of Live Producer.
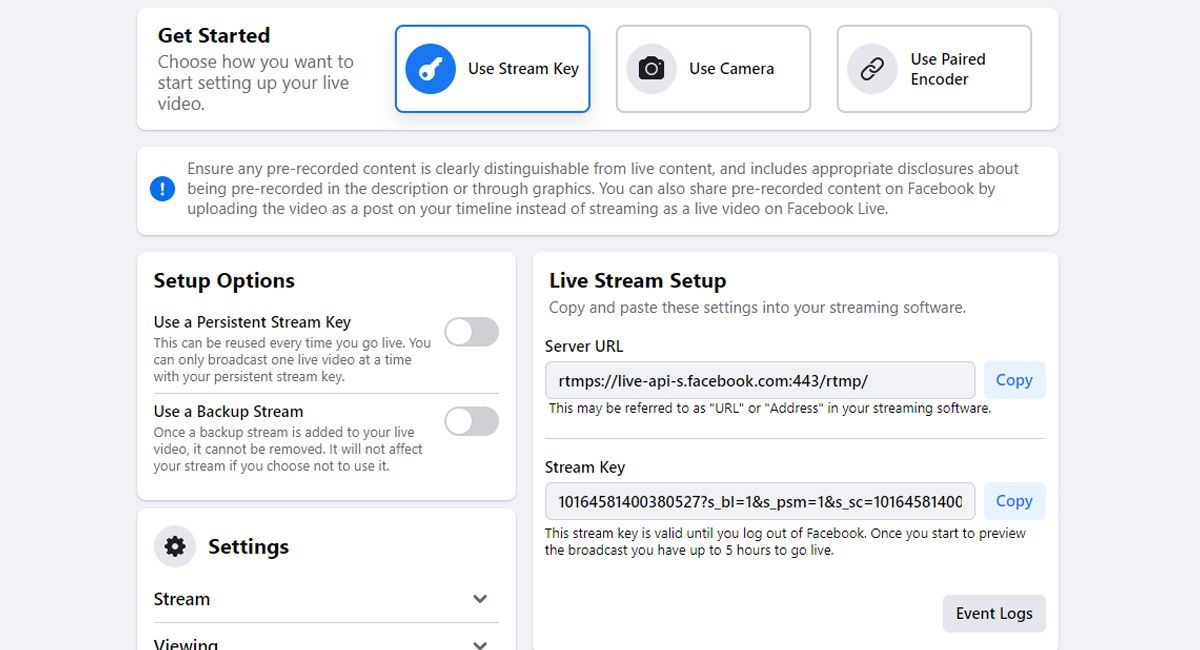
When you're ready, hit Start streaming, and then navigate back to Live Producer to add graphics.
How to Create and Add Graphics to Facebook Live
Facebook's Graphics tool, which is found in Live Producer, allows you to create and manage graphics during or before your live broadcast. Keep in mind that planning ahead is recommended.
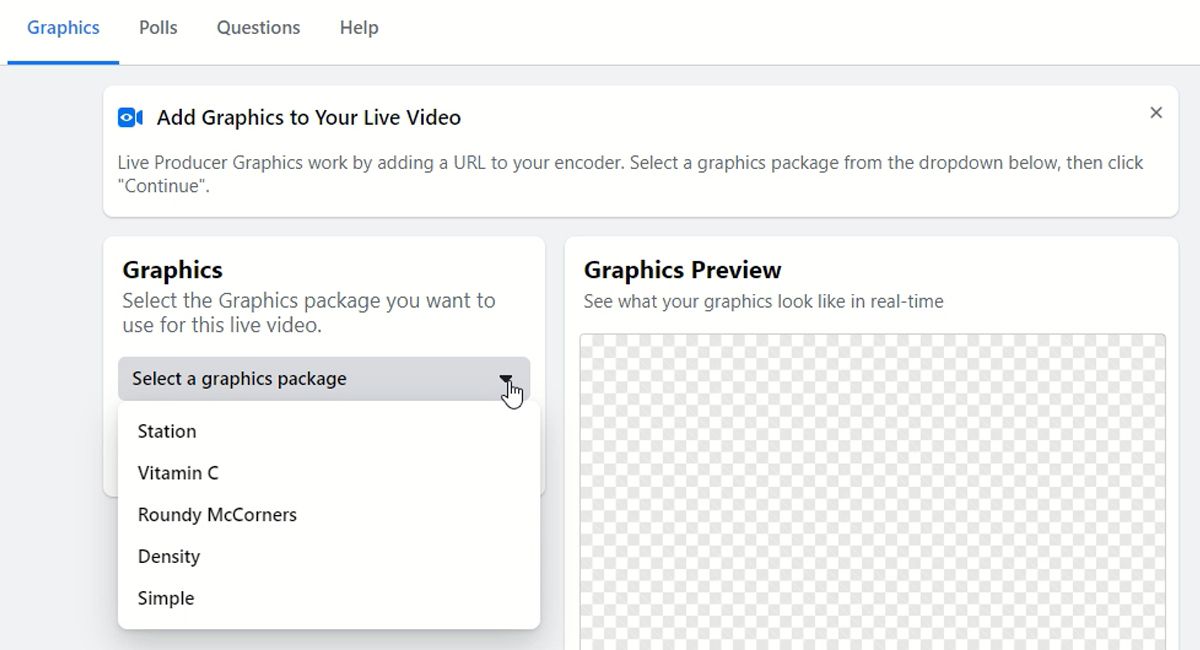
If you're ready to add graphics to Facebook Live, go to Live Producer and click Graphics from the top horizontal menu bar.
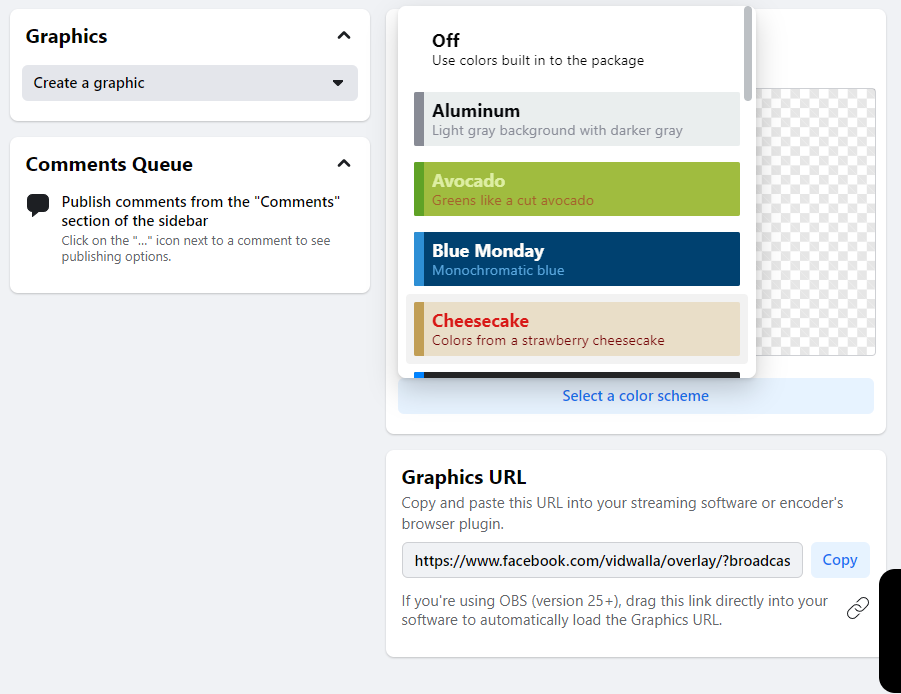
From here, hit the Select a graphics package dropdown menu. Here, you can choose a graphics package that suits your video content. Each package represents a different theme for your graphics. Once you've made a decision, hit Continue.
Now, click the Select a color scheme button under Graphics Preview. Here, you can change the color scheme of the package you've chosen. After you’ve made your selection, copy the URL found under Graphics URL to use it in your encoder.
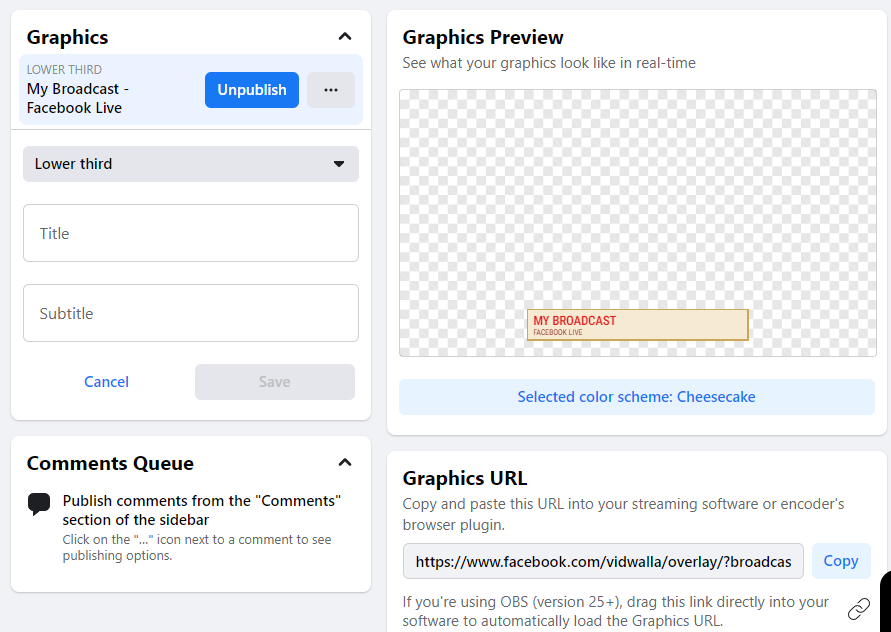
Back in Live Producer, select a graphics type from the Create a graphic dropdown menu. This menu lets you select the position and type of graphics you'd like to display. You can currently choose between a lower third graphic, a ticker, an intro graphic, a full-screen custom image, and a bug (logo).
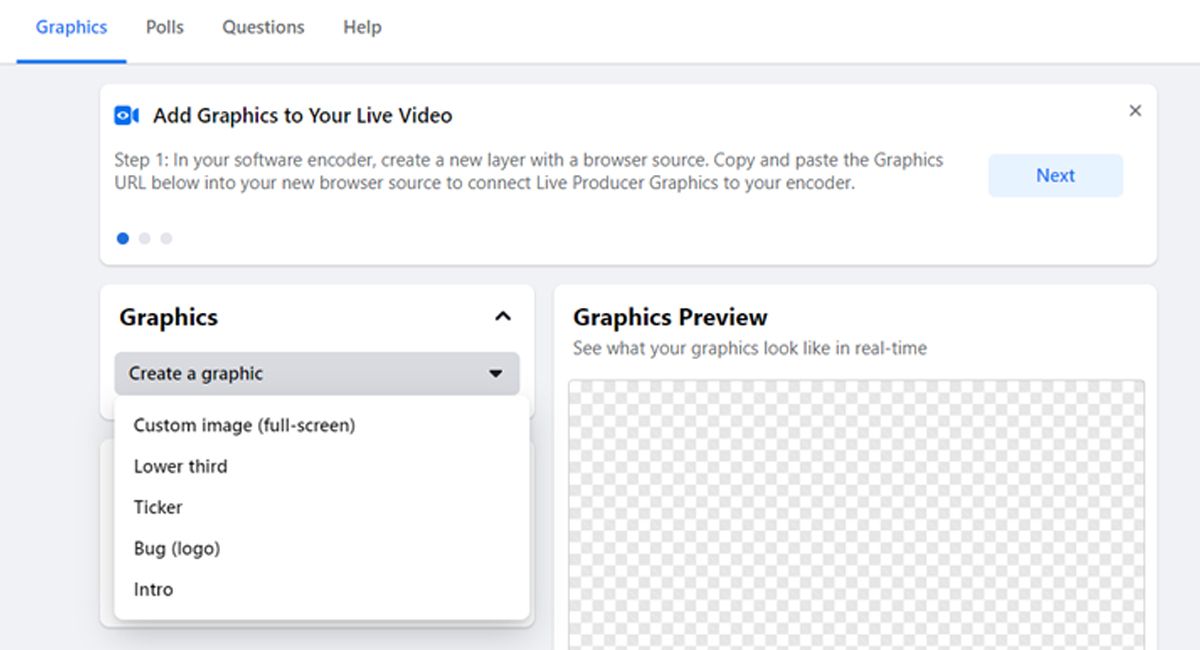
If you choose a text-based graphic, you'll be prompted to enter text. But if you choose a full-screen image or a logo, you'll have to upload an image. Once you've done so, click Save to create a new graphic or text item.
Facebook does not have a recommended size for the logo graphic, which is why preparing ahead and testing is important. You can see how your text or image will display in your Live video in the Graphics Preview window.
When you’re ready to activate a graphic, click Publish from the list of graphics. This graphic will now appear when you go live.
How to Create Interactive Graphics for Facebook Live
What if you want to make your text graphic a little more engaging? Here are a few options available to you in Live Producer to easily create that engagement.
Creating a Poll
Live Producer allows you to create polls with two to four choices. It also lets you choose when the polls should appear during your broadcast.
There is no limit to the number of polls you can run during a single broadcast. Better yet, you can create polls before and during your Live video.
Here's how to create a custom poll for your broadcast:
- In Live Producer, select Polls from the top horizontal menu bar.
- Add the question you want to ask in the Question field, and then add up to four choices in the Options field.
- If applicable, use the checkbox to the right of the options to select the correct answer for your poll.
- Once you're done, click Save.
- To officially add the poll to your broadcast, select Graphics from the top horizontal menu bar.
- From there, you'll see Live Polls available for publishing during your live broadcast.

Once your poll is no longer live, you can click Polls to see how many viewers voted and how they responded.
Creating Questions
In Live Producer, you are able to prepare questions using the Questions section from the top horizontal menu bar. This feature allows you to ask questions before and during the live stream. You can also use it to sort the answers from your viewers from newest to oldest (or vice versa).
Here's how to set up a question:
- Go to Live Producer, and select Questions from the top horizontal menu bar.
- Enter your question and click Save.
- When you want to ask a question during your live broadcast, head to Questions and select the question you wish to ask.

Adding a Viewer Comment
If you aren’t sure of the content you wish to add to your live broadcast, leave it to your viewers. You can pin a comment to the bottom of your video during a Facebook Live broadcast, a great conversation starter if you are looking for engagement.
Although this must be done during your broadcast and can not be prepared ahead of time, it is very easy to do.
- Start your live broadcast, and click the three dots next to the comment in the left sidebar of your live feed.
- Select Add Graphic to Queue.
- Select Graphics from the top horizontal menu bar.
- You will now see that the selected comment is available for publishing at any time during your broadcast.
Making the Most of Your Facebook Live Broadcast
Adding graphics to Facebook Live, whether interactive or decorative, can help you stand out in your next broadcast. It's a great way to make your live streams look more professional, as well as engage with your audience.
Comments
Post a Comment