Branches are central to the concept of version control in programming, and Git in particular. This starter article tells you what a branch is and how to create one using a number of different tools.
What is a Git Branch?
In version control systems, the term branch is used as an analogy with trees in the sense that each branch emerges from another, eventually ending up back at the trunk. Branches allow you to create individual lines of development, in order to work on them in isolation without disturbing other work.
Using Git, you’ll be working on the master branch by default, whether you’re aware of it or not. This is often referred to as your active, current, checked-out, or HEAD branch. At any time during your development cycle, you can create a new branch and carry out separate work in each branch, from that point onwards.
Creating a New Branch on the Command Line
The command-line Git program offers the most power and flexibility, but there’s a lot to learn. If you’re comfortable digging around the man pages and make heavy use of Git, it’s a great option.
Use the git branch <branchname> command to create a new branch with the given name:
$ git branch dev
Branch 'dev' set up to track local branch 'master'.
This branches from the current branch, so make sure you’ve switched to the one you want to branch from before you execute that command.
You can list all branches and confirm the new one has been created using git branch without any arguments:
$ git branch
      1   dev
      2 * master
You can see more information, including which branch another one tracks, using the -vv flag:
$ git branch -vv
      1   dev d1a9e5b [master] commit comment
      2 * master d1a9e5b commit comment
If you try to create a branch before the first commit, you’ll get an error message like:
fatal: Not a valid object name: 'master'.If you try to create a branch using a name that already exists, you’ll get an error message like:
fatal: A branch named 'dev' already exists.The git branch command creates a new branch pointing to the same commit you’re currently working on. However, your working copy will still be pointing at the master branch. To switch to the new branch you just created, use git checkout:
git checkout devThe term checkout might be confusing if you’re used to other version control systems; in Git, checkout refers to switching the currently active branch. Since you’ll usually want to switch to a new branch once it’s created, there’s a shortcut for the whole process:
git checkout -b devThat command means “create a new branch called ‘dev’ and switch to it immediately”. It’s the equivalent of:
git branch dev
git checkout dev
In fact, you can even use git checkout to create a branch from any other, not just the one that is currently checked out. For example, to create a new branch called another, from the branch named dev:
git checkout -b another devCreating a New Branch Using GitHub Desktop
Another way to create Git branches on Windows or macOS is using GitHub Desktop, the official graphical user interface (GUI) program provided by GitHub. Using a GUI is perfect for beginners, and those who have nightmares when someone whispers the word Vim.
GitHub Desktop will always show your current branch in the main toolbar:

Click on that main toolbar button to show details of the repository’s branches, including the option to create a new branch:

Note that, if you start typing a branch name with no matches, GitHub Desktop prompts you to create a new branch and shows the keyboard shortcut to do so—useful if it’s really the kind of thing you find yourself doing a lot:

You can also start by pressing the New Branch button immediately. Whichever route you take, you’ll end up with a dialog to confirm the new branch name:

Your new branch will always be based on whichever branch was active when you created it. GitHub Desktop will switch to your new branch which will automatically track the branch you created it from.
Creating a New Branch Using Tower
Other GUIs are available from third-parties. Tower is free for a 30-day trial period and is available on macOS and Windows.
To create a new branch from the currently checked-out branch, select Create New Branch from the main Repository menu:

To create a new branch from any available branch, right-click on the branch in the left-hand sidebar and select Create New Branch from <branch name>:

Note that, in either case, you can enable the branch as a tracking branch, or change the Starting Point to any branch available:

Creating a New Branch Using GitKraken
GitKraken is another popular GUI that can seem intimidating at first, but it does a good job of visually representing key Git concepts, including branches. GitKraken is free for open-source use and is available for Windows, Mac, and Linux.
Make sure you’re working with the correct active branch; it’s the one highlighted in the branch listing in the left-hand sidebar:

To create a new branch, click the branch icon in the main toolbar:

Enter your branch name and hit ENTER:

The new branch will automatically be checked out and you'll receive a notification on the right-hand side of the screen.
Creating a New Branch on GitHub
As an alternative to running a local app, you can host your repository on one of two popular Git-supporting web apps. The first, GitHub, is a very popular option with the open-source community.
GitHub displays your current (active) branch in your repository view, near the top-left:

Click the button to display existing branches:

Type the name of your new branch and note that you are given the option to create it from the current branch:
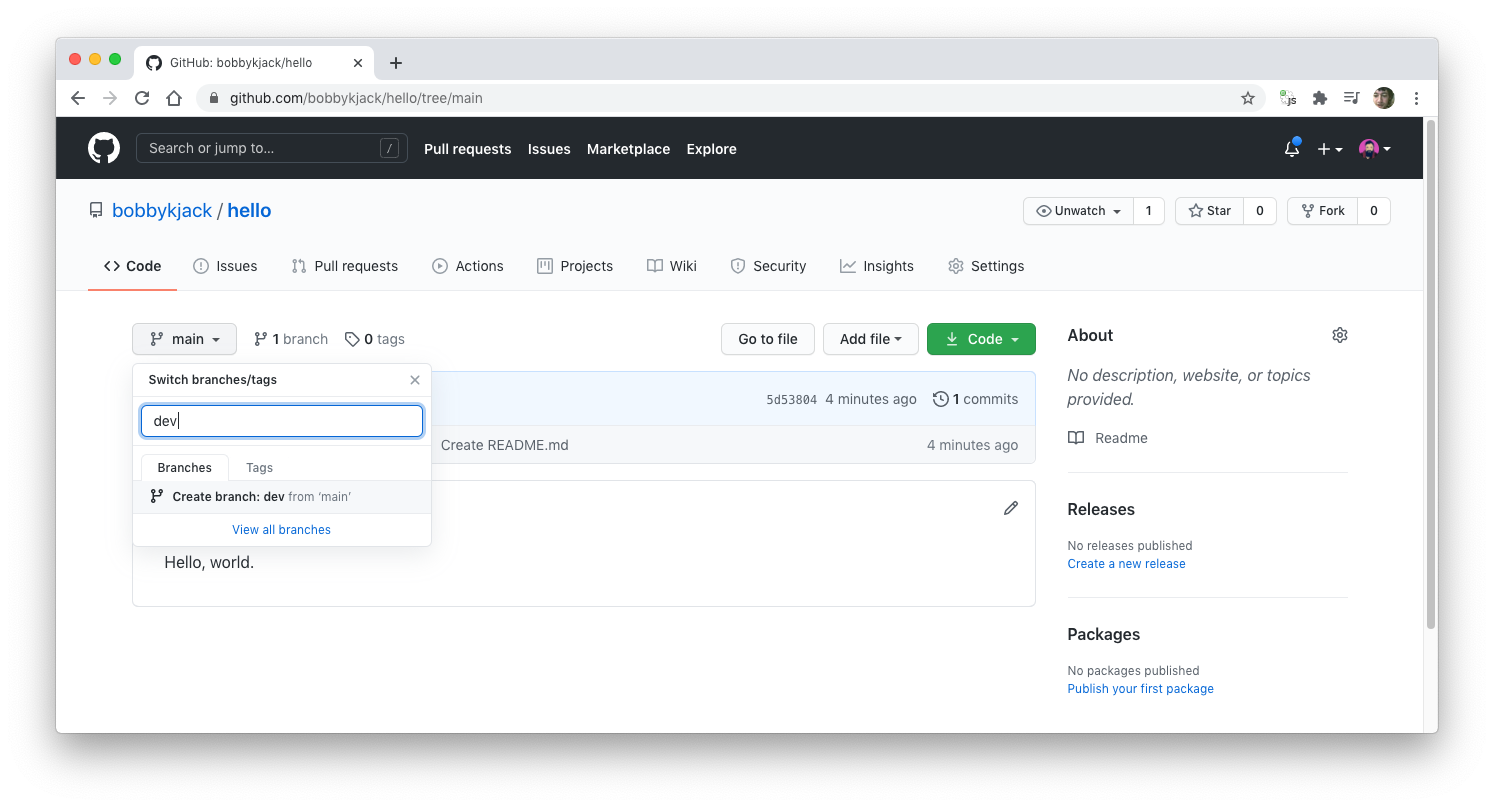
Once created, your new branch becomes active.
Creating a New Branch on Bitbucket
Bitbucket is another popular version control web app that offers free accounts with an unlimited number of private repositories.
From any page within your repository, select the Branches item from the menu on the left:

Click the Create branch button in the top-right. Enter the new Branch name and click Create. If you need to branch from anywhere other than master, change the From branch first:

Bitbucket makes it easy to select a Type which is a prefix added to the branch name that can encourage a more organized approach to branches. It’s just a convention, rather than a built-in Git feature, but it can prove useful.
Once created, Bitbucket displays a view of your new branch:
 Learn to Branch Out With Git
Git is all about branches: they’re cheap to create and they allow multiple streams of work to coexist, ready to be merged when complete. Once you’re familiar with creating, switching, and merging branches, you’ll be well on the way to using Git to its full potential.
Comments
Post a Comment