Do you want to create AMP-friendly forms on your WordPress site?
Accelerated Mobile Pages or AMP is a Google project that makes websites load faster on mobile devices.
While AMP offers a great mobile browsing experience by making your webpages load faster, it disables many useful features on your website.
One of them is contact forms. Since AMP uses a limited set of HTML and JavaScript, it cannot load your WordPress forms properly on AMP pages.
But thankfully, now there is an easy solution available. WPForms, the most beginner-friendly WordPress form plugin now helps you create AMP-ready WordPress forms. Their team recently worked with Google to make AMP forms easy for WordPress.
In this article, we will show you how to create AMP forms in WordPress using WPForms (the easy way).
Creating AMP Forms in WordPress (Step by Step)
In order to use AMP with WordPress, you need to install and activate the official AMP plugin for WordPress. For more details, see our step by step guide on how to install a WordPress plugin.
Once activated, the plugin will automatically add Google AMP support for your WordPress site.
However, you can change AMP settings for your website by going to AMP » General from your dashboard.
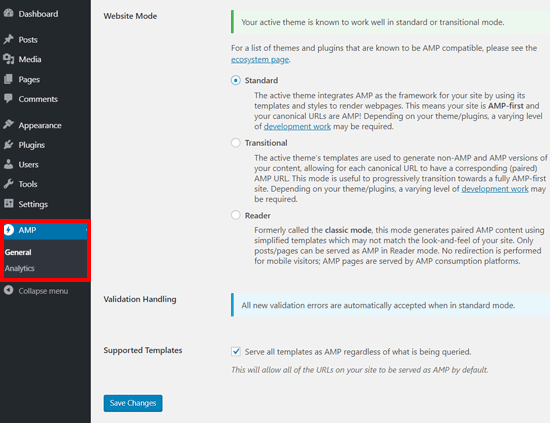
From the AMP settings page, you can enable or disable AMP on your website, choose a website mode for AMP, and choose supported templates.
Once you have configured AMP, the next step is to create an AMP compatible contact form on your WordPress site.
Step 1. Create a WordPress Form with WPForms
To get started, install and activate the WPForms Lite plugin on your site. It is the lite version of the WPForms Pro plugin.
Both the lite and pro version of WPForms allows you to create a basic AMP ready contact form. In our article, we will be using the free version for screenshots.
Once the plugin is installed and activated, you need to head over to WPForms » Add New page to create a new WordPress form.
On the form setup screen, you can choose a form template to get started quickly. You can select the Blank Form if you want to start from scratch.
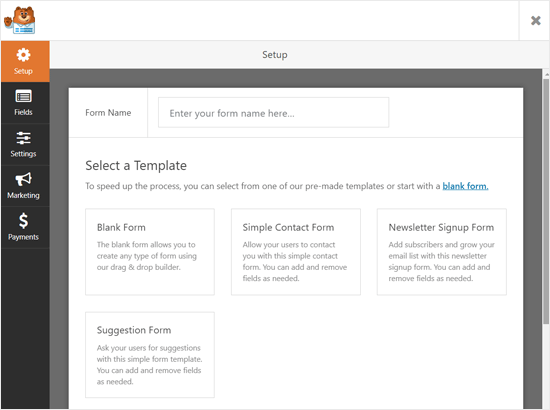
Next, it will open the form builder page.
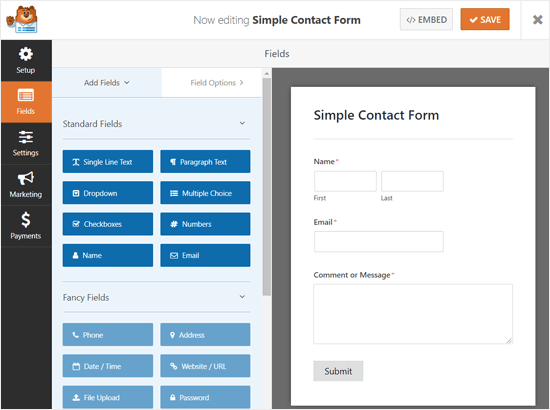
From here, you can add or remove form fields. To add a new field to your form, you can simply click on a form field from the left panel, and it will appear in the form builder panel on the right.
After that, you can configure the field options. Simply click on a field, and then Field Options will appear.
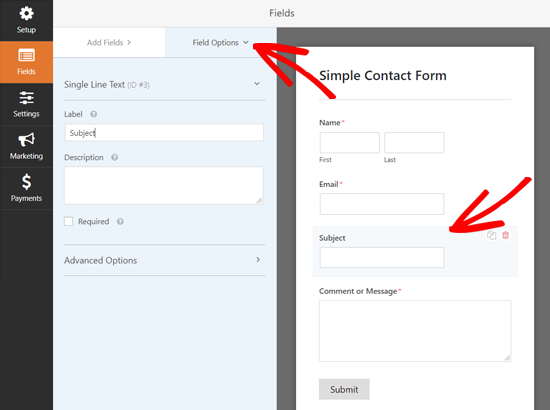
Similarly, you can customize all the other fields.
After that, you can click on the Settings tab to configure your form settings.
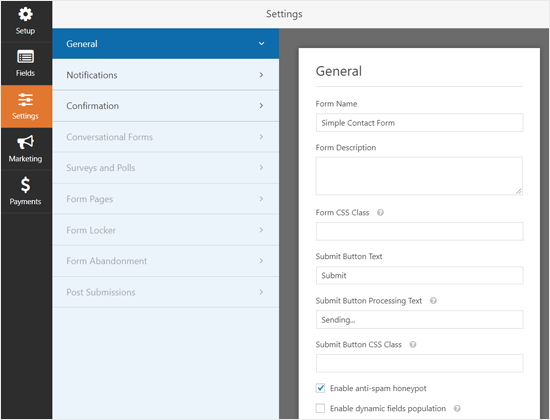
The General Settings allow you to change your form name, submit button text, submit button processing text, enable anti-spam Honeypot, and more.
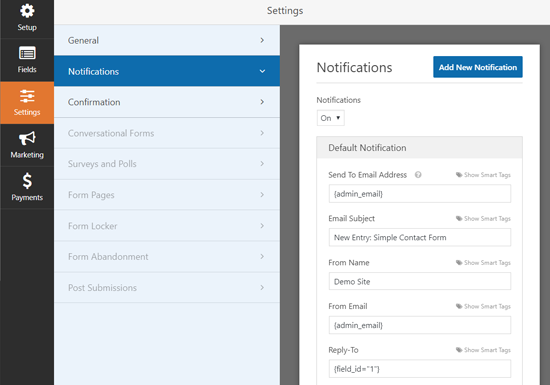
Next, you can click on the Notifications tab to set up email notifications to notify you when a user completes the form.
Next, you can click on the Confirmation tab to set up a confirmation message to be shown when a user submits the form.
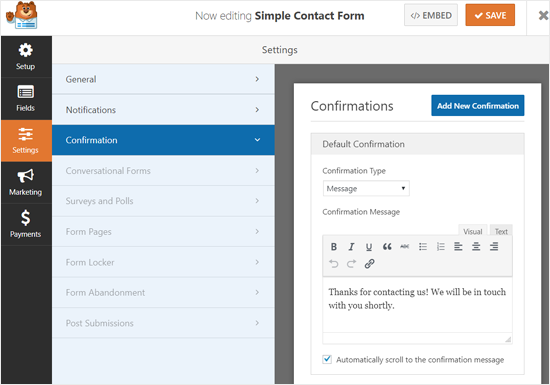
After the configuration is complete, you can save your form.
Step 2. Add Your AMP Form to a Page
Now that your WordPress form is ready, you can add it to a page.
First, you need to create a new page or open an existing one where you want to add the form.
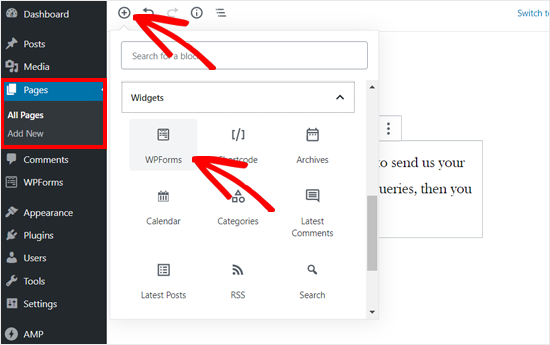
On your page edit screen, click on the Add New Block icon and select the WPForms block.
After that, you can see the WPForms widget added to your page edit screen. You just need to select the form you created earlier, and the widget will instantly load it in the page editor.
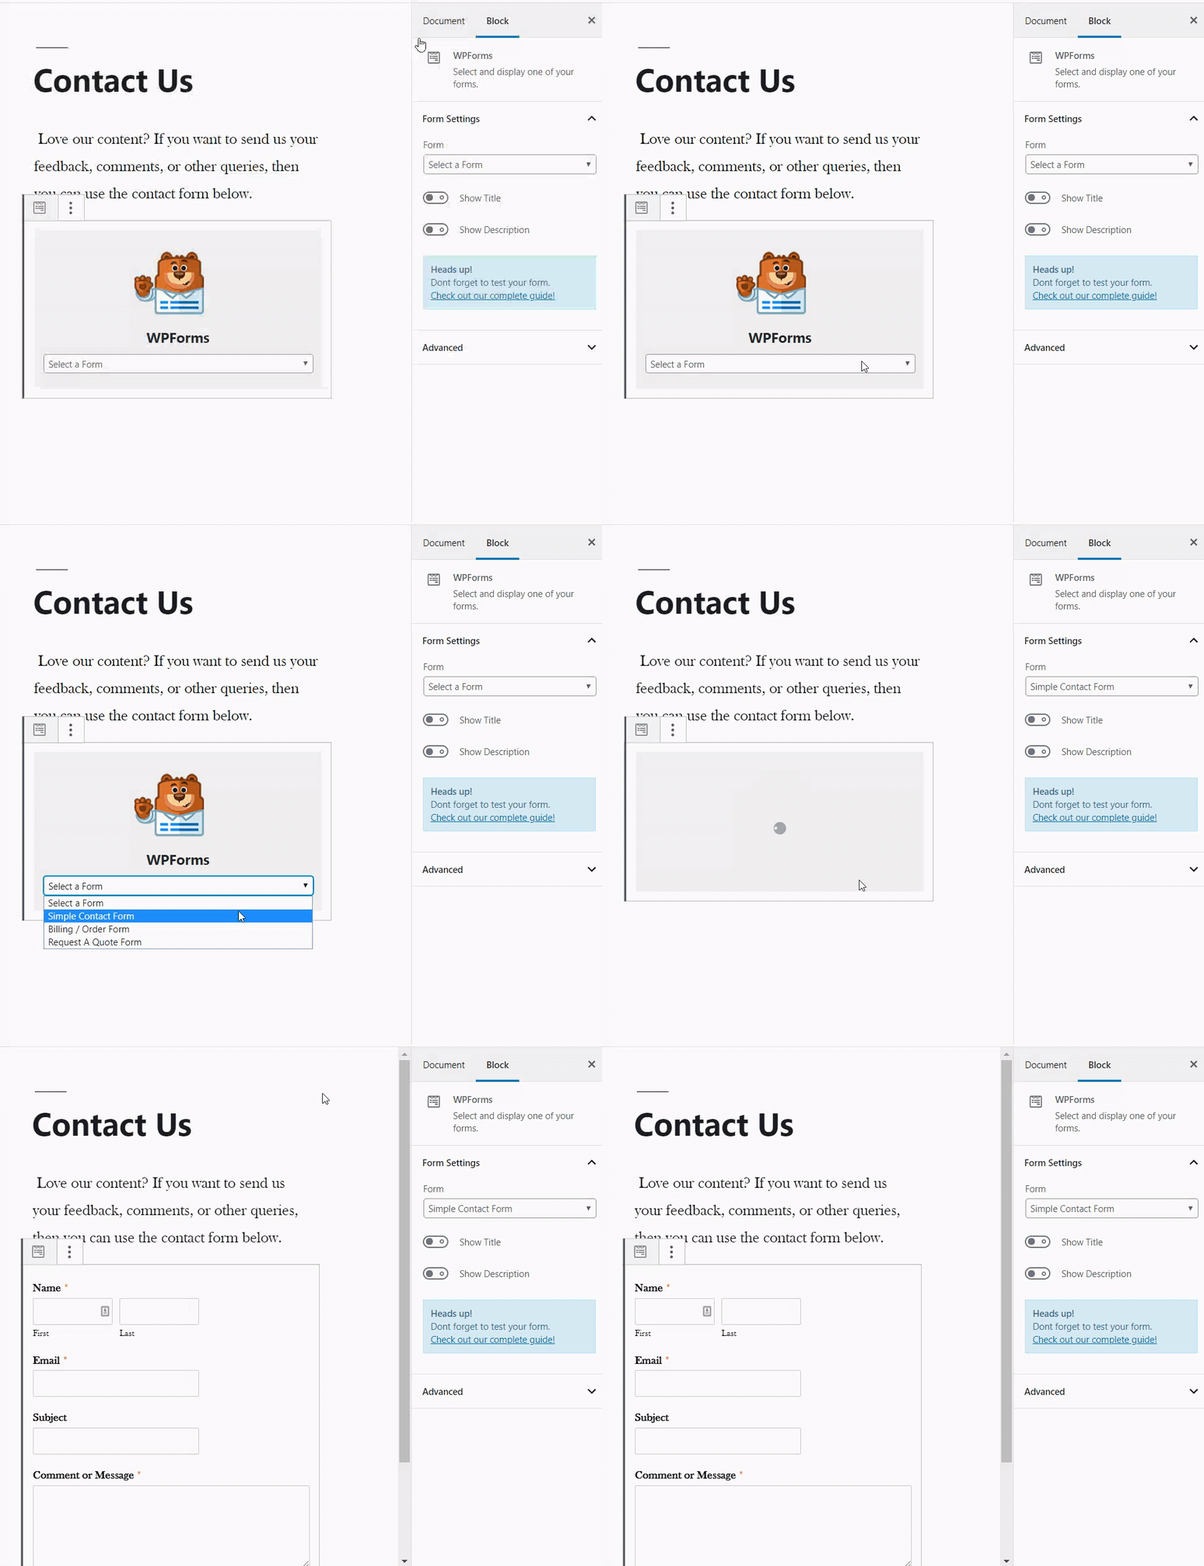
Next, you can publish or update your page.
That’s all! You don’t need to configure anything else. The WPForms Lite plugin will add full AMP support to your form now.
If you want to see how it looks, then you can open the page on your mobile phone.
Or you can open the page on your desktop browser by adding /amp/ or /?amp at the end of your page URL. For example, https://ift.tt/2Yxiq1s.
Adding Google reCAPTCHA to Your AMP Form
By default, WPForms includes anti-spam honeypot to catch and block spam. Additionally, you can use Google reCAPTCHA to reduce spam submissions.
To use Google reCAPTCHA with your AMP forms, you need to register your site for Google reCAPTCHA v3 and get the Google API keys.
Go to the Google reCAPTCHA website and click on the ‘Admin Console’ button at the top right corner of the page.

After that, you need to sign in with your Google account. Once done, you will see the ‘Register a new site’ page.
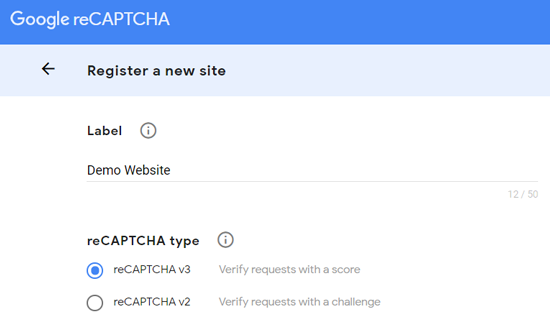
First, you need to enter your website name in the Label field. Google AMP only supports reCAPTCHA v3, so you need to choose it from the reCAPTCHA type options.
After that, enter your domain name under the Domains section.

The Owners section shows your email address by default. You can also add another email if you want.
Next, you need to accept the reCAPTCHA Terms of Service to continue. Also, select the ‘Send alerts to owners’ checkbox, which will allow Google to notify you about problems like misconfiguration and suspicious traffic on your site.
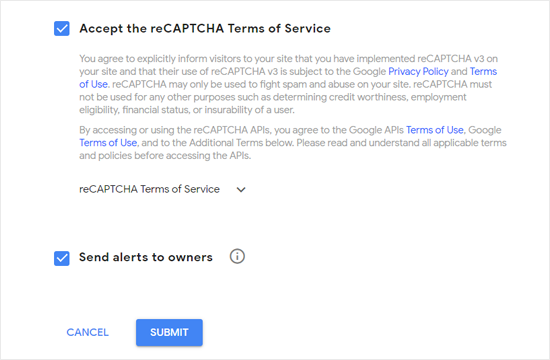
Once done, click on the Submit button.
Next, you will see a success message along with the site key and the secret key to add reCAPTCHA on your site.
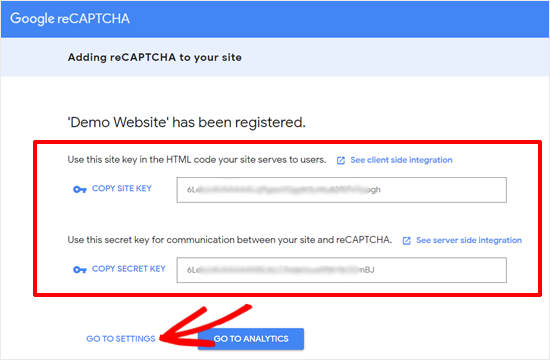
Now you have the Google API keys to add reCAPTCHA to your forms. However, there is one more adjustment required to ensure AMP compatibility with the reCATCHA. Click on the ‘Go to Settings’ link there.
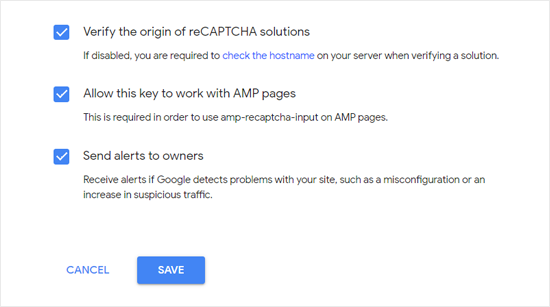
Next, you will see the reCAPTCHA settings again with ‘Allow this key to work with AMP pages’ checkbox. Simply check the box and click on the Save button below.
Now that you have Google API keys to add reCAPTCHA on AMP forms, you need to open WPForms » Settings » reCAPTCHA page in your WordPress dashboard.
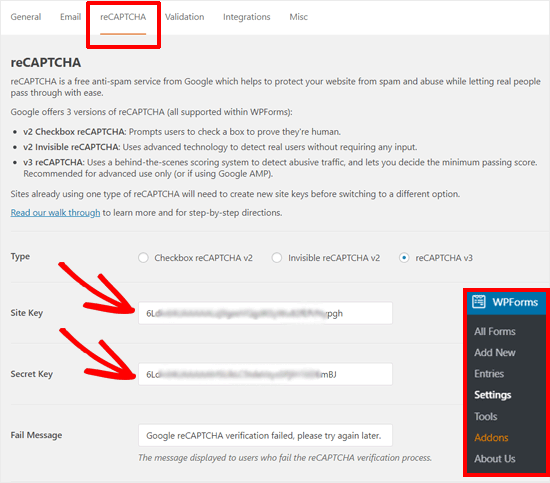
On this screen, you need to choose reCAPTCHA v3 option and paste the site key and secret key. After that, click on the Save Settings button.
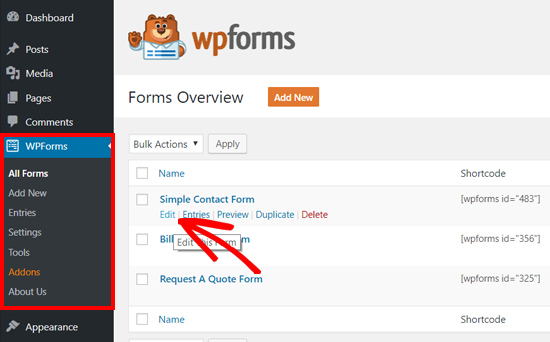
Now that Google reCAPTCHA is added to WPForms, you can enable it in your forms where needed. Go to WPForms » All Forms and select the form where you want to enable the reCAPTCHA.
Once the form setup screen appears, click on the Settings tab and select the General Settings section. At the bottom, you can see ‘Enable Google v3 reCAPTCHA’ checkbox.
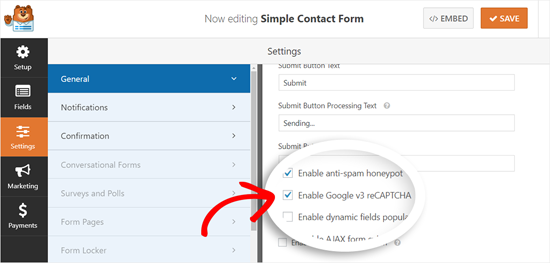
Check the box and then save your form by clicking on the Save button at the top right corner.
After that, you can revisit your contact page and see the AMP form with reCAPTCHA in action.
We hope this article helped you to learn how to create AMP forms in WordPress easily. You may also want to see our guide on how to create GDPR compliant forms in WordPress.
If you liked this article, then please subscribe to our YouTube Channel for WordPress video tutorials. You can also find us on Twitter and Facebook
The post How to Create AMP Forms in WordPress (The Easy Way) appeared first on WPBeginner.
Comments
Post a Comment